 BSC User Guide
Introduction to Balance Sheet Certification (BSC)
Accounting organizations are required to review and verify the completeness and correctness of their balance sheet on a regular basis. This process is commonly known as balance sheet reconciliation or balance sheet certification (BSC).
To perform this task, the account team reviews the balances, line items and movements of the respective balance sheet accounts. Where required, supporting documentation and commentary is added to explain and confirm that the balances are complete and correct. Often alongside those tasks, additional journal postings and clearing postings are added.
Redwood's Balance Sheet Certification solution allows accounting teams to perform these tasks, and significantly eases the work. Redwood's solution can retrieve and evaluate balance-level information as well as line item-level information in real-time from an ERP system. Evaluation rules are applied on the balance level as well as on the line item-level so that an average auto-certification of 95% is possible.
This allows the preparers and the approvers to focus on the evaluation of open items.
Process overview
The balance sheet reconciliation in Redwood's solution follows some basic steps explained in this section. Some of these steps happen in a fully automated way, and finance users only need to interact with the reconciliation process at certain stages of the process.
The balance sheet reconciliation in Redwood is a preconfigured process, which can be customized according to your organization's needs. For more information on how to change the configuration, please refer to the technical guide.
The following are the high-level milestones in the reconciliation process:
- Retrieve all information - In this stage the process retrieves all relevant information for the reconciliation, such as some balance-level information and line item-level information for the account(s) being certified.
- Apply certification rules - Based on the defined rulesets, the reconciliation will perform the checks to auto-certify the account and individual line items.
- Workflow to preparer - After the automatic rules have been applied, the resulting information is filled into the Reconciliation Form and presented to the responsible preparer. The preparer receives a link to the form, so that they can access the data and finish the preparation tasks that are required for this reconciliation. The preparer can also restart the reconciliation to retrieve more updated information (start over again from step 1).
- Workflow to approver - After the preparer has completed their task, the reconciliation is routed to the responsible approver. The approver receives a link to the form, so that they can access the data and review the reconciliation. If the approver accepts the reconciliation, it proceeds to the final step. If the approver rejects the reconciliation it is routed back to the preparer.
- Finalize reconciliation - The reconciliation is locked so that the information becomes read-only.
The following sections describe how to access the Reconciliation Form as well as perform the preparation and review.
Preparer Workflow
Accessing the Reconciliation
For every reconciliation process, the preparing person will receive a notification when they are required to look at the data that was prepared by the solution. The responsible preparer will receive an email notification with the request for review and a link to the Reconciliation Form.
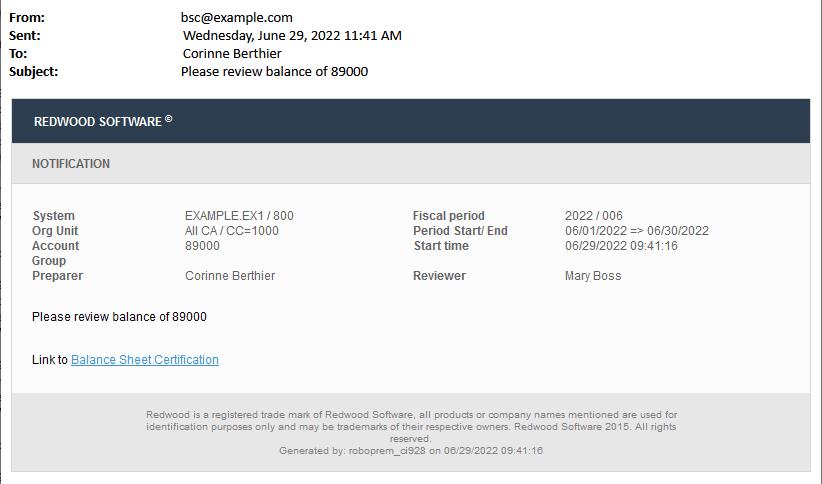
Figure 1: Example Email Notification
The same notification is also presented to the preparer in the Inbox, which can be accessed from the Redwood Home screen. The Inbox delivers additional useful options, such as the opportunity to delegate the reconciliation to another person, and additional filtering and grouping capabilities that provide an easy way to respond to actions (see Create Action Items)
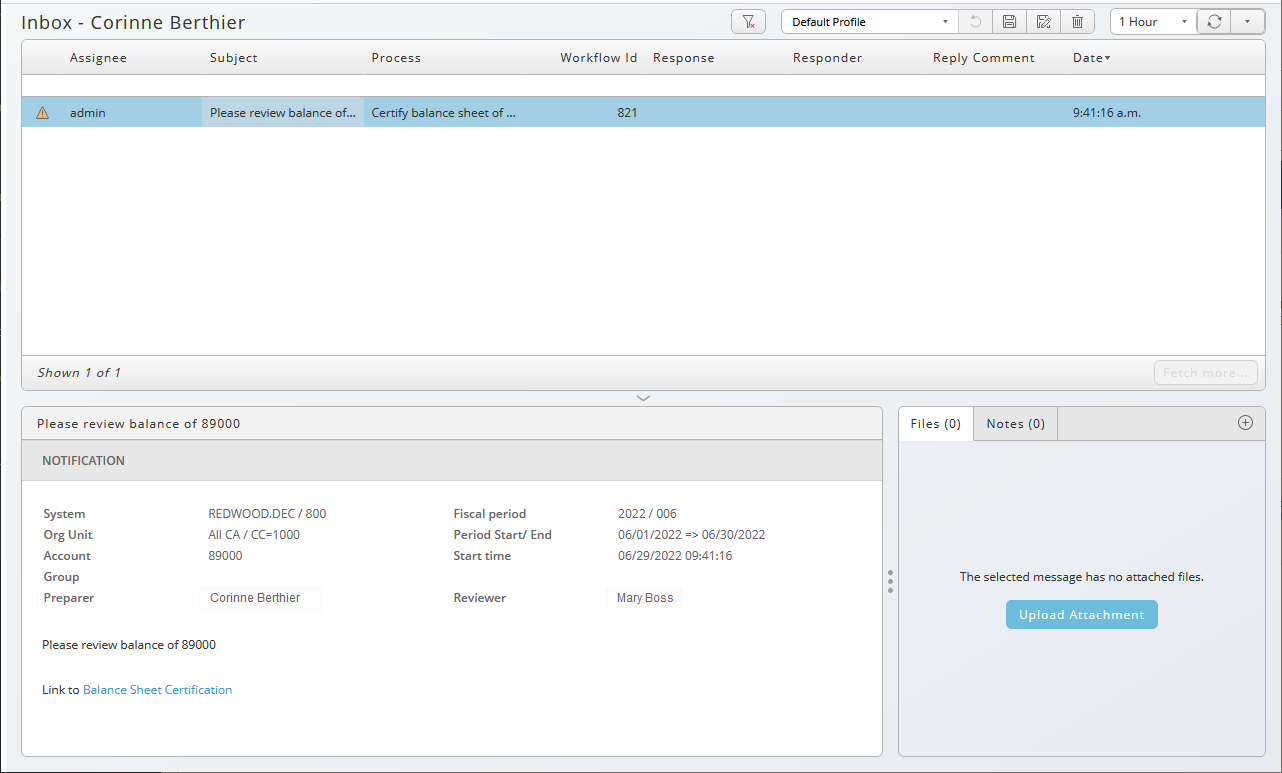
Figure 2: Notification in the Inbox
The Reconciliation Form
Click on the link either in the email or in the Inbox to be redirected to the Reconciliation Form. This form consists of three main parts:
- The Overview: Includes entity, account, and balance information as well as comments and attachments on the reconciliation.
- The Breakup table: Functions like a pivot table that can be individually configured based on all available columns in the Line Item table.
- The Line Items table: Includes all line items that have been retrieved for this reconciliation along with some additional information on the status of the line items.
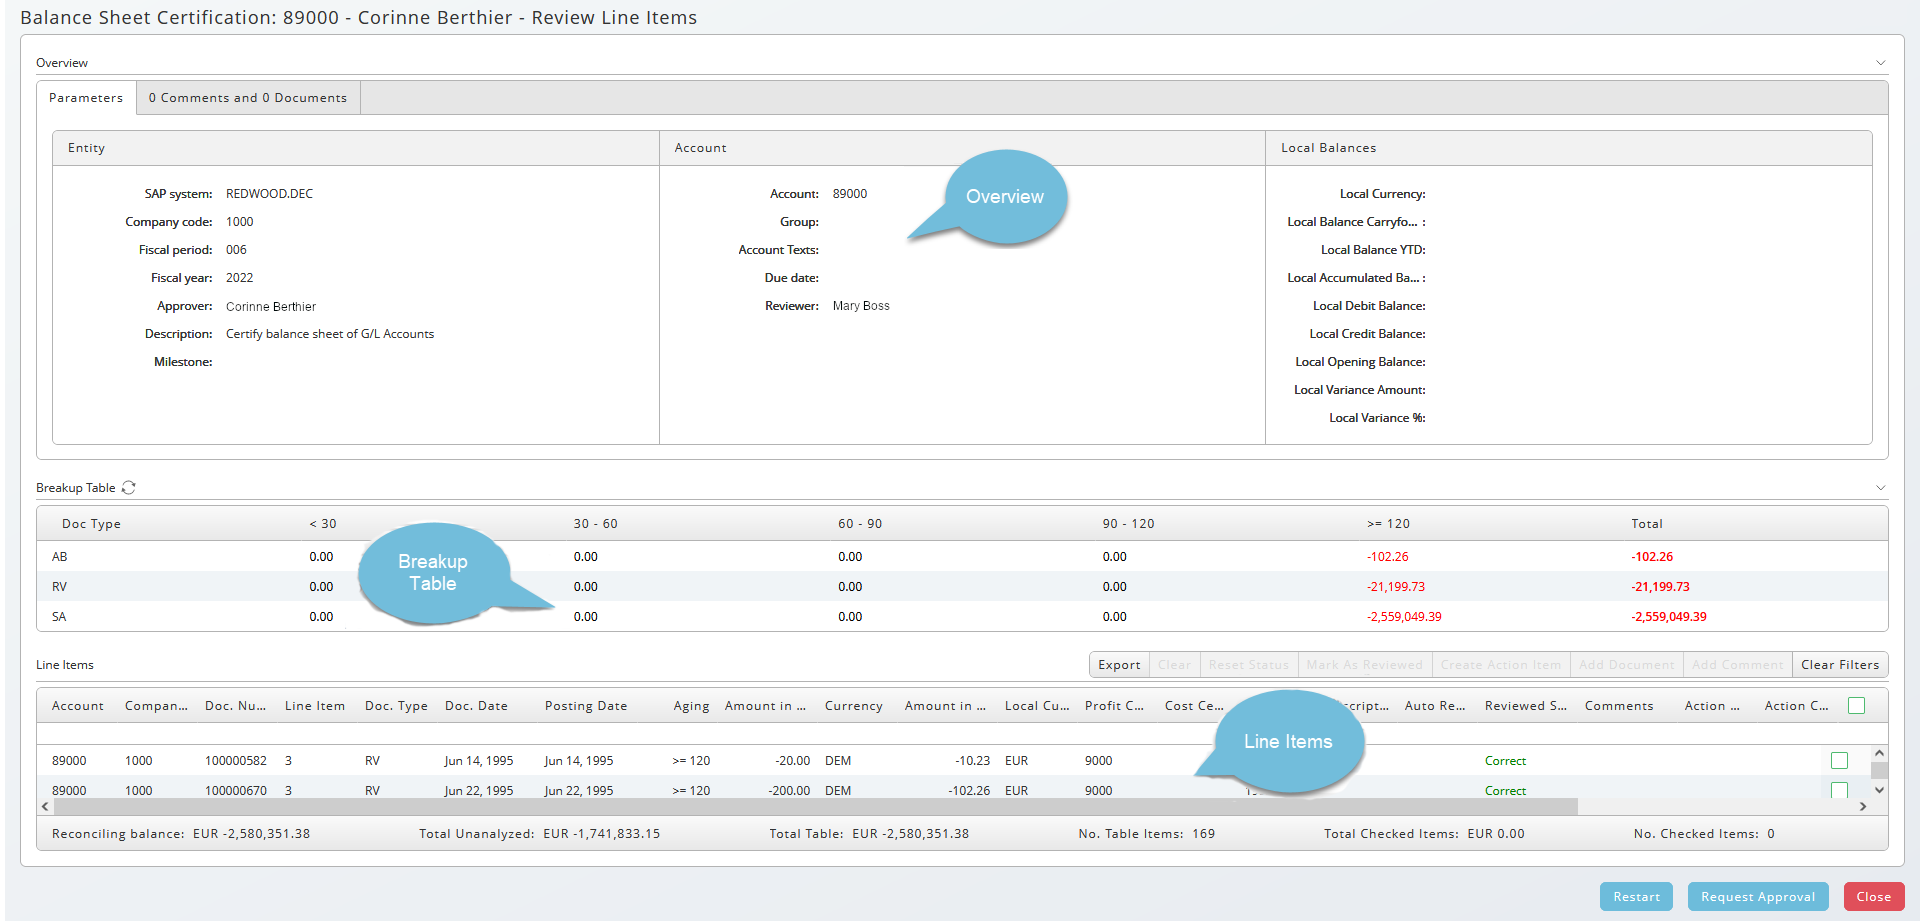
Figure 3: Reconciliation Form Structure
Perform Account or Account Group-Level Review
Use the Overview and Breakup table sections of the Reconciliation Form to review the data on a higher level, such as on an account-level, account group-level, or line item group-level, depending on how the reconciliation was configured.
Overview of Comments and Attachments
The Overview section displays the high-level account information.
Comments and attachments can be added from the Overview. This information will be kept as part of the reconciliation and only removed if it is actively deleted by a user. In opposition to comments and attachments on a line item-level, attachments on the reconciliation level will not be published to the underlying ERP system.
To add a comment to a line item or document:
- Check a line item, choose Add Comment.
- In the dialog, select if you want to comment on the line item or on all line items in the document.
- Enter a comment in the textbox and choose Ok to store it.
For each comment and attachment, or every action on supporting documents, the system will generate an appropriate history entry including the information on user, time, and date of the action.
To upload a supporting document, picture, or other file, in the Supporting Documentation section:
- Choose the Plus (+) button.
- Choose the Document field to browse and choose a file.
- Choose Upload to the left of the Trashcan icon to upload the selected file.
- Choose OK.

Figure 5: Uploading Supporting Documents
To delete a file:
- Hover over the added file to display the Trashcan icon.
- Click the trashcan to delete the file.
Adding comments and attachments to documents:
- Check a line item and choose Add Comment or Add Document.
- Choose Document in the Type field and either fill in your comment or add your attachment.
- You comment or attachment will be added to all line items in the document.
Use Breakup tables to Analyze the Data
Breakup tables act like pivot tables and show grouped line items in a particular way. As part of the setup of a reconciliation, it is possible configure grouped line items by almost any column that is available in the Line Item table, such as a profit center, a cost center, or by an aging profile.
Click on the currently active Breakup table name (Aging shown in the image below) to display a menu to switch between different Breakup table configurations that are available for the reconciliation.
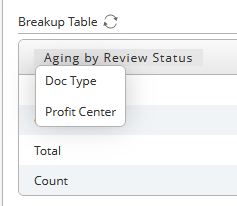
Figure 6: Click the Breakup Table Name
Selecting one of the offered options will show the respective grouping and aggregation. Clicking on the amount in the Breakup table filters the appropriate line items automatically in the bottom section of the form.
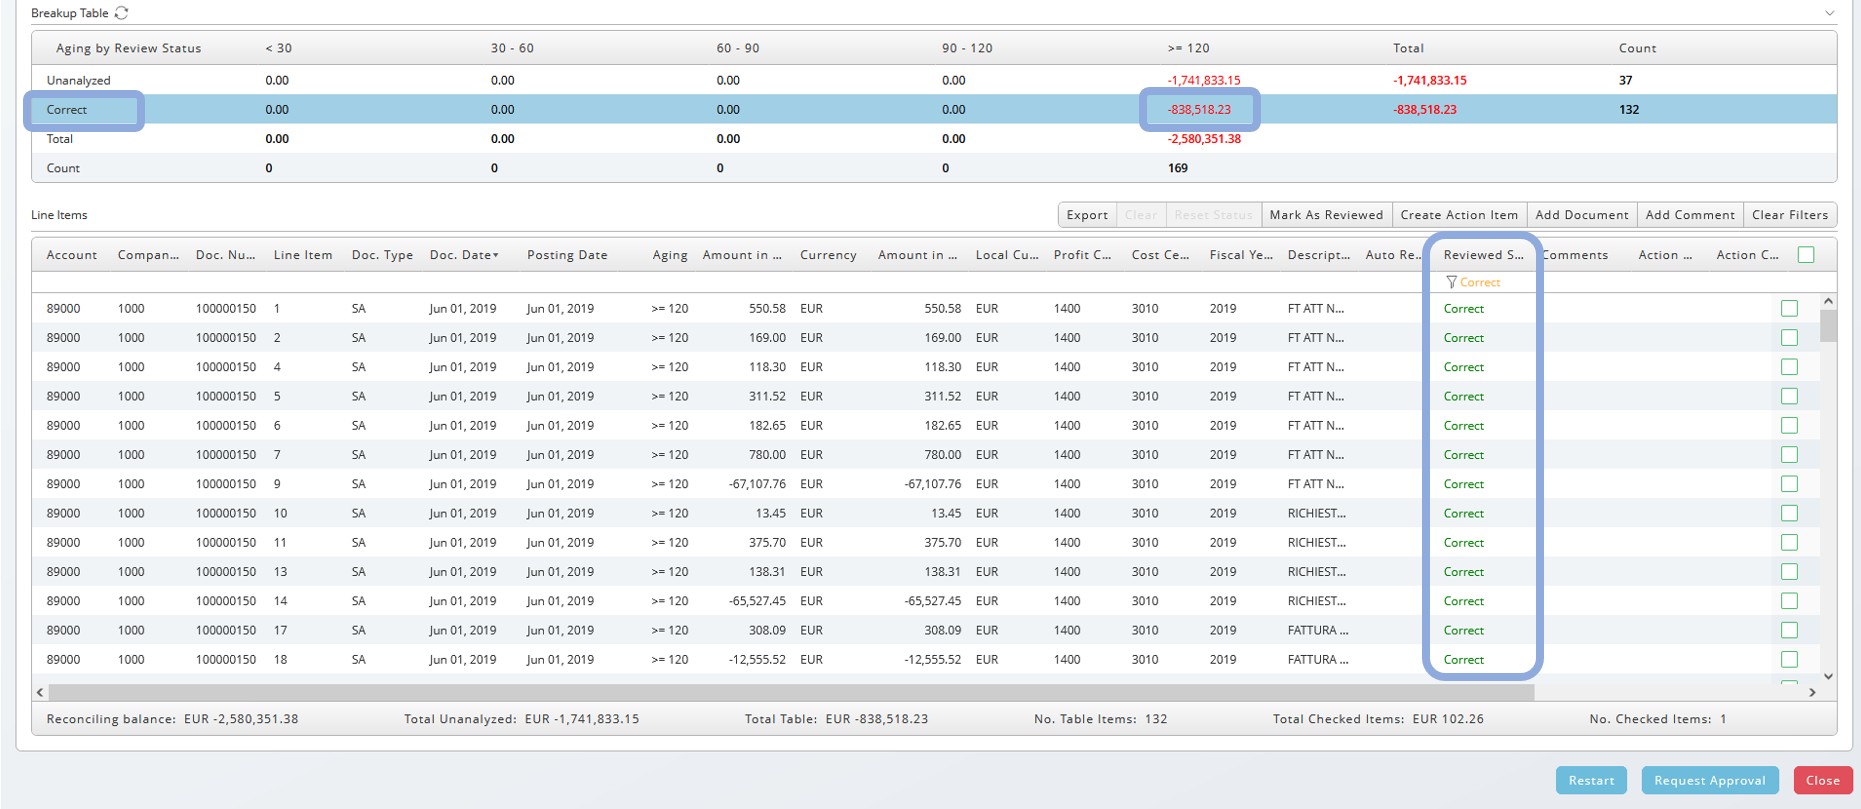
Figure 7: BSC Breakup Table - Click on the Amount to Filter Line Items
Perform Line Item-Level Review
The Line Item table is the area of the Reconciliation Form that shows the details of the line items that have been retrieved from the ERP system. It is possible to configure which line item details to retrieve and show in this form as part of the technical configuration of the reconciliation.
In the image below, in addition to the regular line item information, additional columns that have been created by the solution are showing the reconciliation status of the following:
- Result description of the auto certification rules
- The review status of the line item
- Action items
- Action item creators
- Deadlines
- Action item status
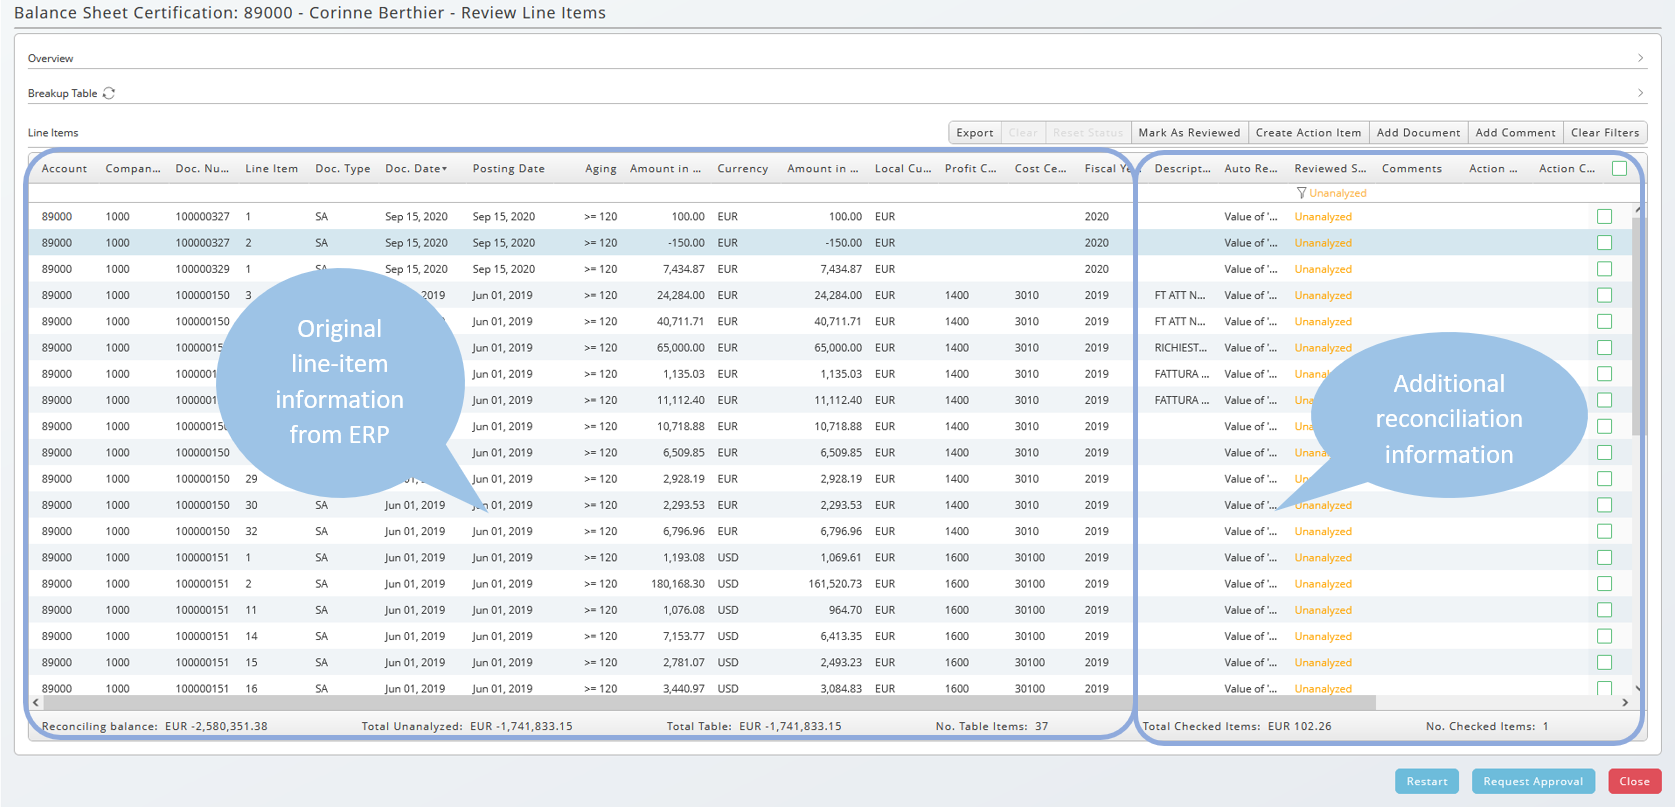
Figure 8: BSC Line Items Table
The available action buttons for individual line items or groups of line items are shown at the top right side of the Line Item table section.
- Post a clearing for selected line items
- Reset the reconciliation status of line item(s)
- Mark line item(s) as reviewed
- Create an action item for line item(s)
- Add a comment to line item(s)
- Add a document to line item(s)

Figure 9: BSC Line Items Table - Action Buttons
To perform an action, select the relevant line item(s) and choose on the desired action button to perform the action.
note
The action buttons can only be chosen if line items have been selected.
The latest actions and respective messages from the system are shown at the top of the Reconciliation Form.

Figure 10: BSC Message Pane
Click on the x button in the top right corner of the Reconciliation Form to close this message pane.
Filter Line Items
The Line Item table allows for data filtering in every column of the table.
To filter:
- Hover in the cell below the column header. The text add filter will appear.
- Click on add filter to define appropriate filter criteria for that column.

- Select specific entries (see above), limit a range, or search for text, depending on the type of column (data). The filtered value will be shown right next to the Filter icon.

To delete a filter, choose the Filter icon. A red x indicates when deleting is possible.
Review Line Items
Select line items using the check boxes on the right-hand side and choose the Mark as reviewed button to confirm that the line item is okay.

Figure 11: BSC Line Items Table - Select and Mark as Reviewed
A prompt to add a comment will appear. Setting a deadline is optional. If the deadline is reached, the Reviewed Status of the line items will be reset to Unanalyzed.
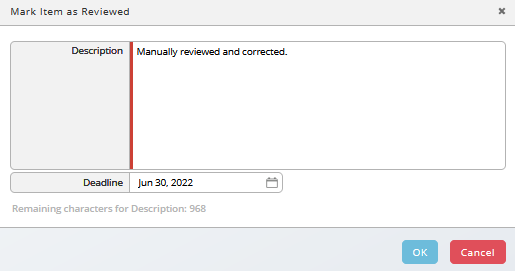
Figure 12: BSC Line Items Table - Mark as Reviewed button - Mark Item as Reviewed Popup
Corrections are visible immediately in the form. A tooltip shows more information when hovering over the comment. Clicking on the comment displays the entire comment.
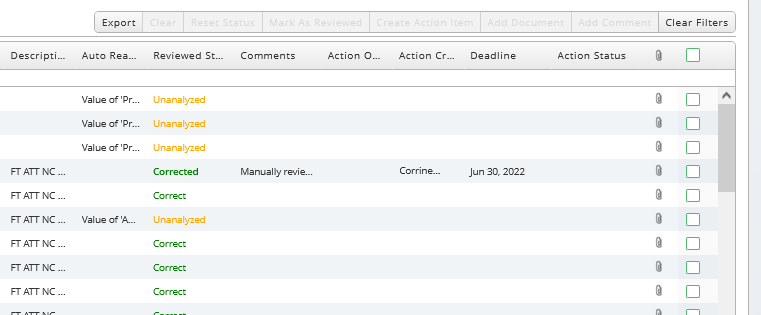
Figure 13: BSC Line Items Table - Hover to View Comment Tooltip
Create Action Items
- Select the line item(s) and choose the Create Action Item button.
- In the Create Action Item popup window:
- In the Assignee field, select the assignee of the action item from the dropdown.
- In the Description field, include a brief description of what the action item is. Note: This is a required field.
- Select a date from the Deadline field dropdown calendar.
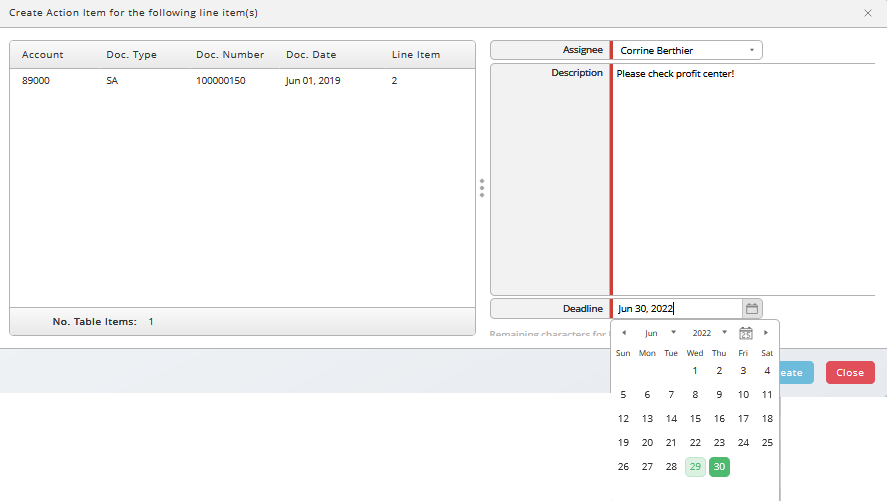
- Click the OK button and the system will create the action item and show an appropriate message.
- As part of the action item workflow, the assignee will receive an email.
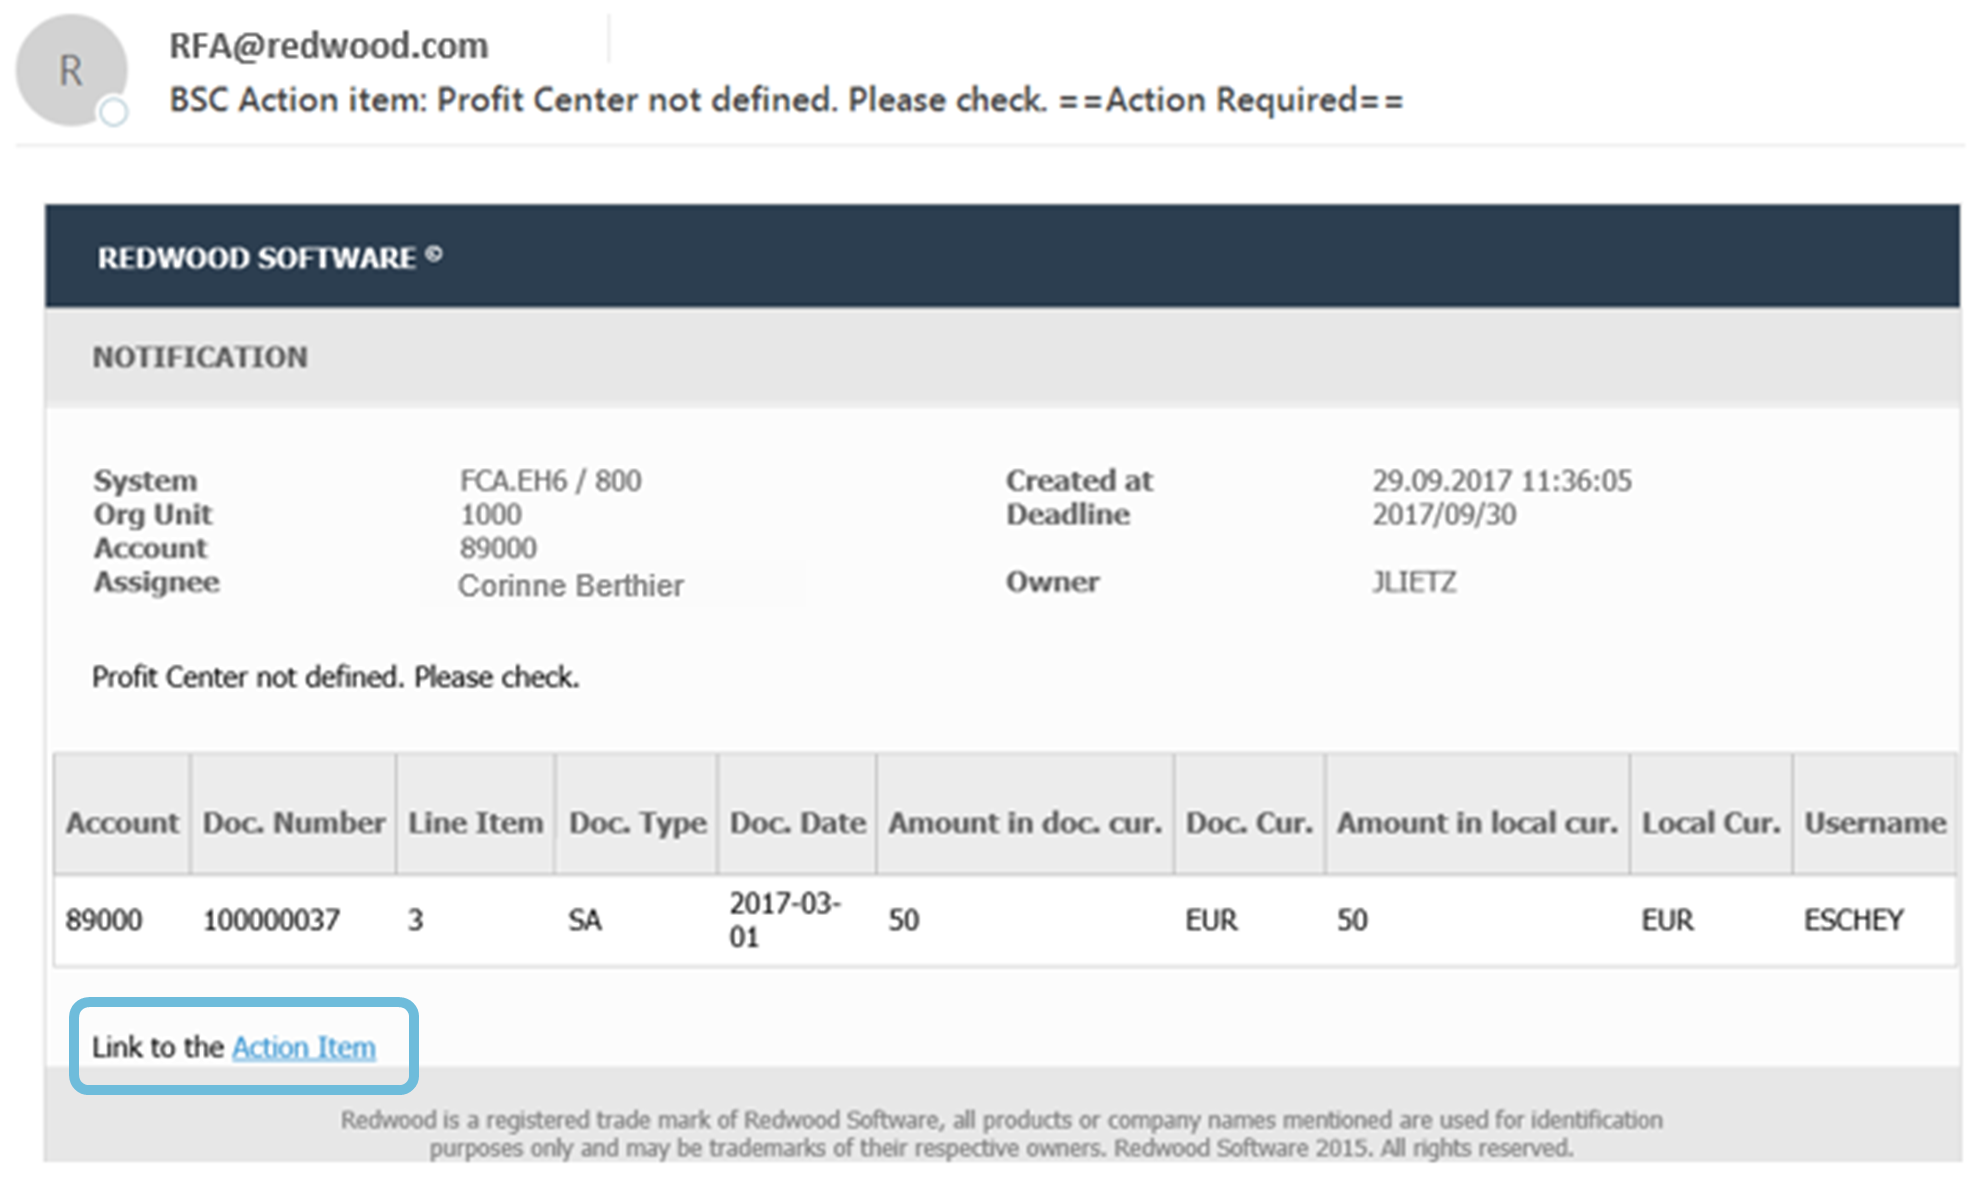
The email informs the assignee about the necessary action(s) and the relevant line items. A link to the action item itself is included. Clicking on this link allows the assignee to access the action item and respond to it.

Figure 14: BSC Line Items Table - Action Item for Review
The Inbox presents the same information on action items as the email, shows the same link, and also allows access to action items.
After the assignee has reviewed and completed any outstanding action items, the status of the action item will be set to Completed. Action items can be filtered from the Inbox, even after they have been completed.

Figure 15: Inbox - Filter Action Items
Upload Additional Documents to a Line Item
Additional documents or further comments may be added to one or multiple line items. Once documents have been added to the line items in the reconciliation, those documents will also be uploaded to the respective ERP system on the line item- or document-level, depending the Type chosen.
To start this process:
- Select one or multiple line items in the Reconciliation Form and choose the Add Document button.

- Enter a document title in the Title field.
- In the Type dropdown choose whether the uploaded document will be attached to the line item-level or the document-level in ERP.
- In the Document field, browse to search for the document to upload and press the Upload button to the left of the Trashcan icon.
- Click the OK button to upload the selected document to the reconciliation in Redwood as well as to ERP.

- When the document is uploaded, a note will be added to the Comments section of the line item(s).
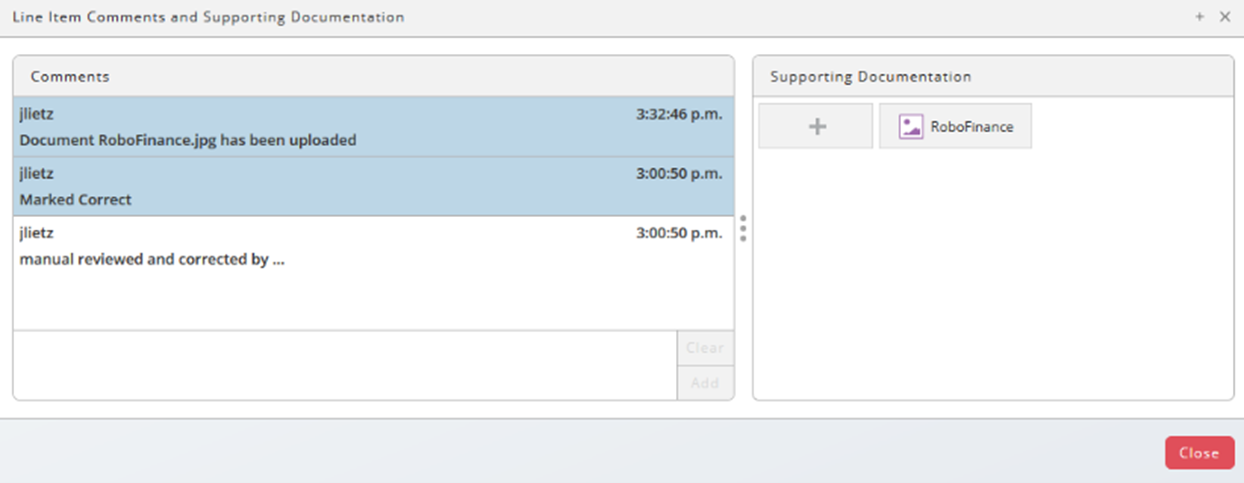
- Click on the Comment column of the appropriate line item(s) in the Reconciliation Form to see the entire history or to access to the uploaded files.
Important Notes on ERP Upload for SAP:
- If two line items are selected and the upload type Line Item is chosen, then the uploaded document will be added to both line items in SAP.
- If one line item is selected and the upload type Document is chosen, then the uploaded document will be added to all line items that belong to the same document number.
Clearing
From the Reconciliation Form it is also possible to clear line items both within the Redwood solution as well as in the ERP system.
- Select line items and choose the Clearing button.

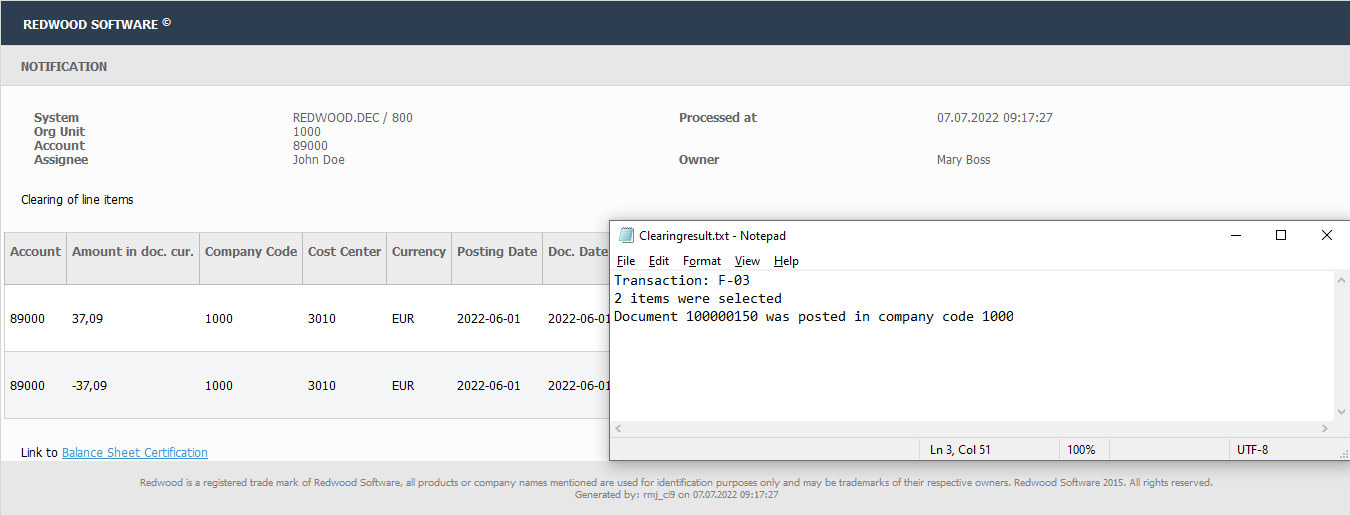
- This starts the process that posts a clearing document into the ERP system. In the Reconciliation Form the Clearing running status indicates that the clearing is in progress.

- After the clearing has completed the status will display either Clearing completed or Clearing failed, depending on the outcome of the process.
- The preparer will also receive an email notification with the details of the clearing process in a text file attachment.
Restart the Preparation
Use the restart functionality in cases where data is outdated, or things have changed and a refresh of the information of the account being reconciled is necessary.
The button to restart the reconciliation is shown at the bottom of the Reconciliation Form.
Pressing the Restart button will start the reconciliation over from Step 1 listed in Process Overview, which will redo the automated parts of the reconciliation as well as any manual review steps.
In detail, the system will:
- Lock the current Reconciliation Form and make it read-only.
- Retrieve updated information on account- and line item-level.
- Apply the defined rules again.
- Generate a new Reconciliation Form with the updated account and line item data.
- Remember all the actions that have been performed on the line items in the previous reconciliation run and merge them into the updated form with the more recent line item data.
- Send a new notification with a link to the newer Reconciliation Form that was just created.
With a restart, the reconciliation data from the account is refreshed therefore
- Some line items that no longer need to be reviewed might have been removed compared to the first line item list.
- New additional line items might have been added to the list to review.
Preparation work will be saved and is not lost if the line item is still relevant after the restart and data refresh.
Finish the Preparation
The Request Approval button to forward the reconciliation to the approver appears at the bottom of the Reconciliation Form.
If all line items have not been reviewed, a popup notification will be displayed indicating how many line items have not yet been analyzed, as shown in the image below.
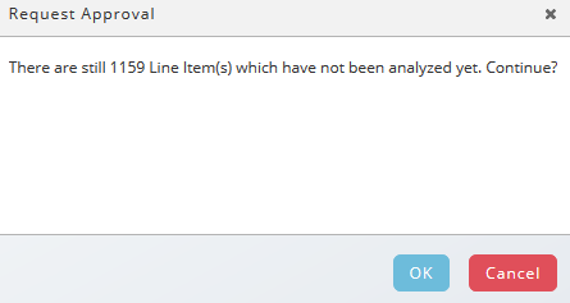
Figure 16: Notification Message of Outstanding Line Items
After forwarding the reconciliation to the approver, the Reconciliation Form will be locked and can no longer be edited. A notification message will be displayed on the Reconciliation Form as shown in the image below.

Figure 17: Notification Message that the Form is Locked and Under Review
Using links to the Reconciliation Form after it has been completed will display a message that the page is read-only.

Figure 18: Read-Only Message
Approver Workflow
Access the Reconciliation Using the Appropriate Link
After the preparer has completed their task and forwarded the reconciliation for approval, the approving person will receive an email notification and be asked to approve the reconciliation.
Using either the link from the email or from the Inbox, the approver can navigate to the Reconciliation Form, as described in Preparer Workflow.
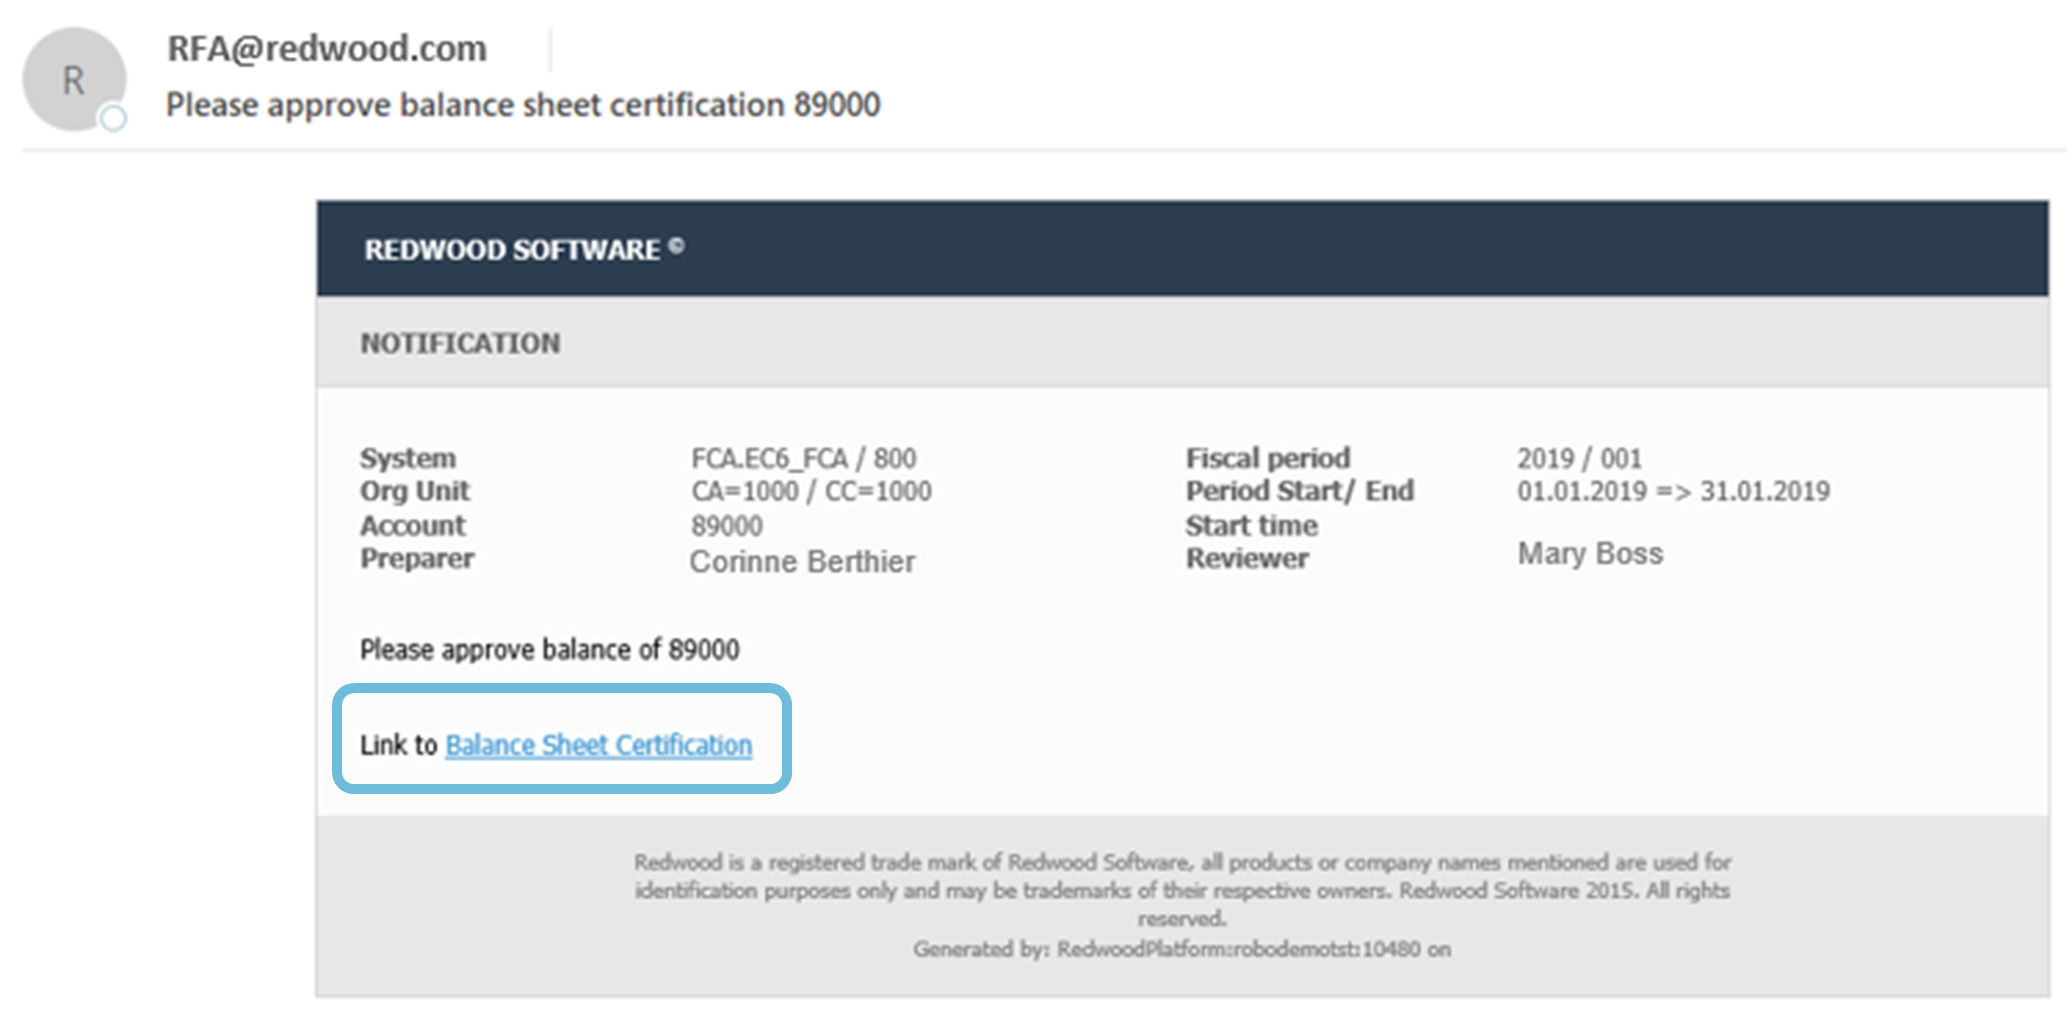
Figure 19: Email Notification with Link to Reconciliation Form
The Reconciliation Form
The Reconciliation Form for the approver looks very similar to the form for the preparer (see The Reconciliation Form) but can also be configured separately. The main differences are in the possible actions of the approver.
An approver can:
- Check the account- or account group-level information just like the preparer (see Overview, Comments and Attachments to the Reconciliation)
- Use the Breakup table just like the preparer (see Use Breakup tables to Analyze the Data)
- Filter line items just like the preparer (see Filter Line Items)
- Add a comment or a document to line item(s) (see Upload Additional Documents to a Line Item)
- Reject line items
- Accept or Reject the reconciliation

Figure 20: BSC Line Items Table - Approver Action Buttons
Perform the Approval
The typical workflow of the approver is:
- Check the account- or account group-level information alongside the additional documentation (see Perform Account or Account Group-Level Review).
- Check line items that have been manually corrected by the preparer and review the additional documentation (see Perform Line Item-Level Review).
- Reject line items with issues (see Reject Line Items).
- Add additional information and commentary as required (see Upload Additional Documents to a Line Item).
- Reject the reconciliation to send it back to the preparer if there are still open issues (see Reject the Reconciliation).
- Accept the reconciliation to complete it (see Approve and Finalize the Reconciliation).
Both the preparer and approver can see the complete history when choosing on the Comment or Paperclip icons.
Reject Line Items
As part of the approval process, the approver can reject line items that have been manually corrected. If a manual correction of a line item is not rejected, the system considers it to be approved at the end of the process.
To reject line items, select them and choose the Reject button at the top of the Line Item table. If a line item has been rejected, the Reviewed status of that line item is changed accordingly.
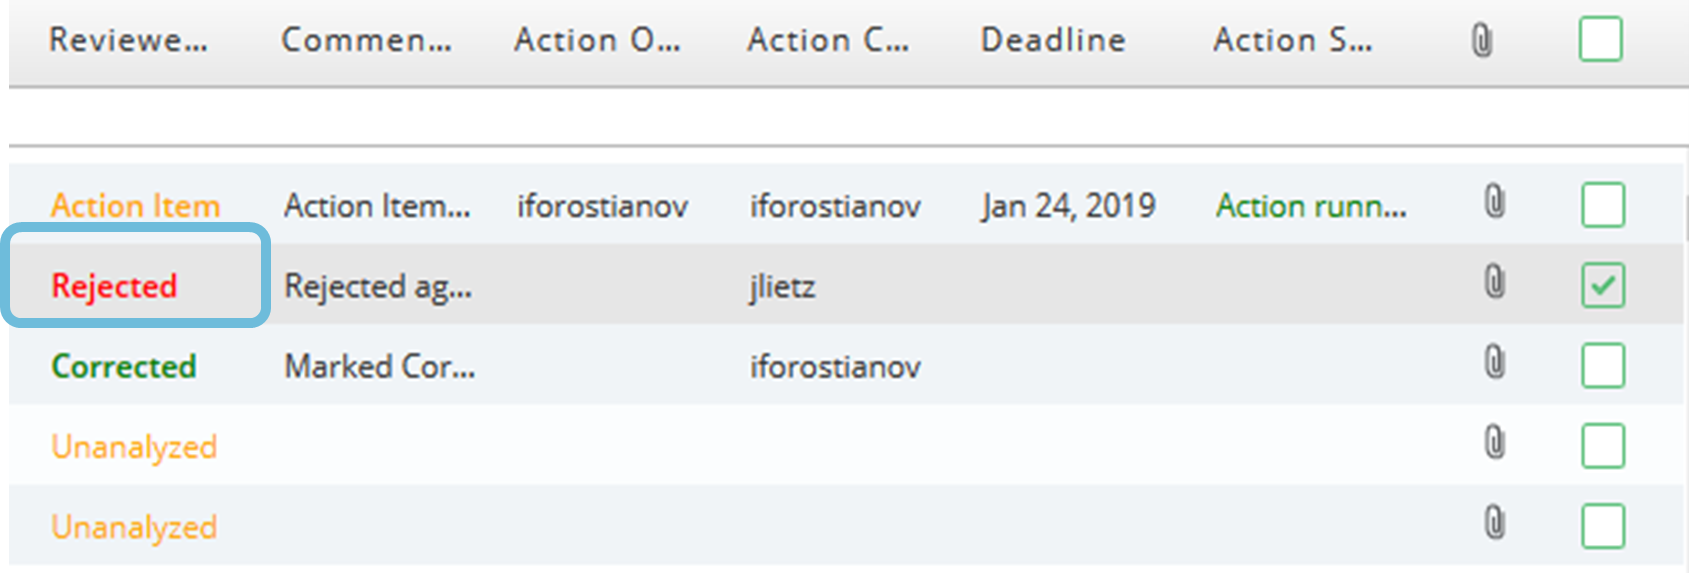
Figure 21: Rejected Reviewed Status
Reject the Reconciliation
If an approver concludes that the reconciliation cannot be completed or approved, they can send it back to the preparer for another review by choosing the Reject button at the bottom of the Reconciliation Form.
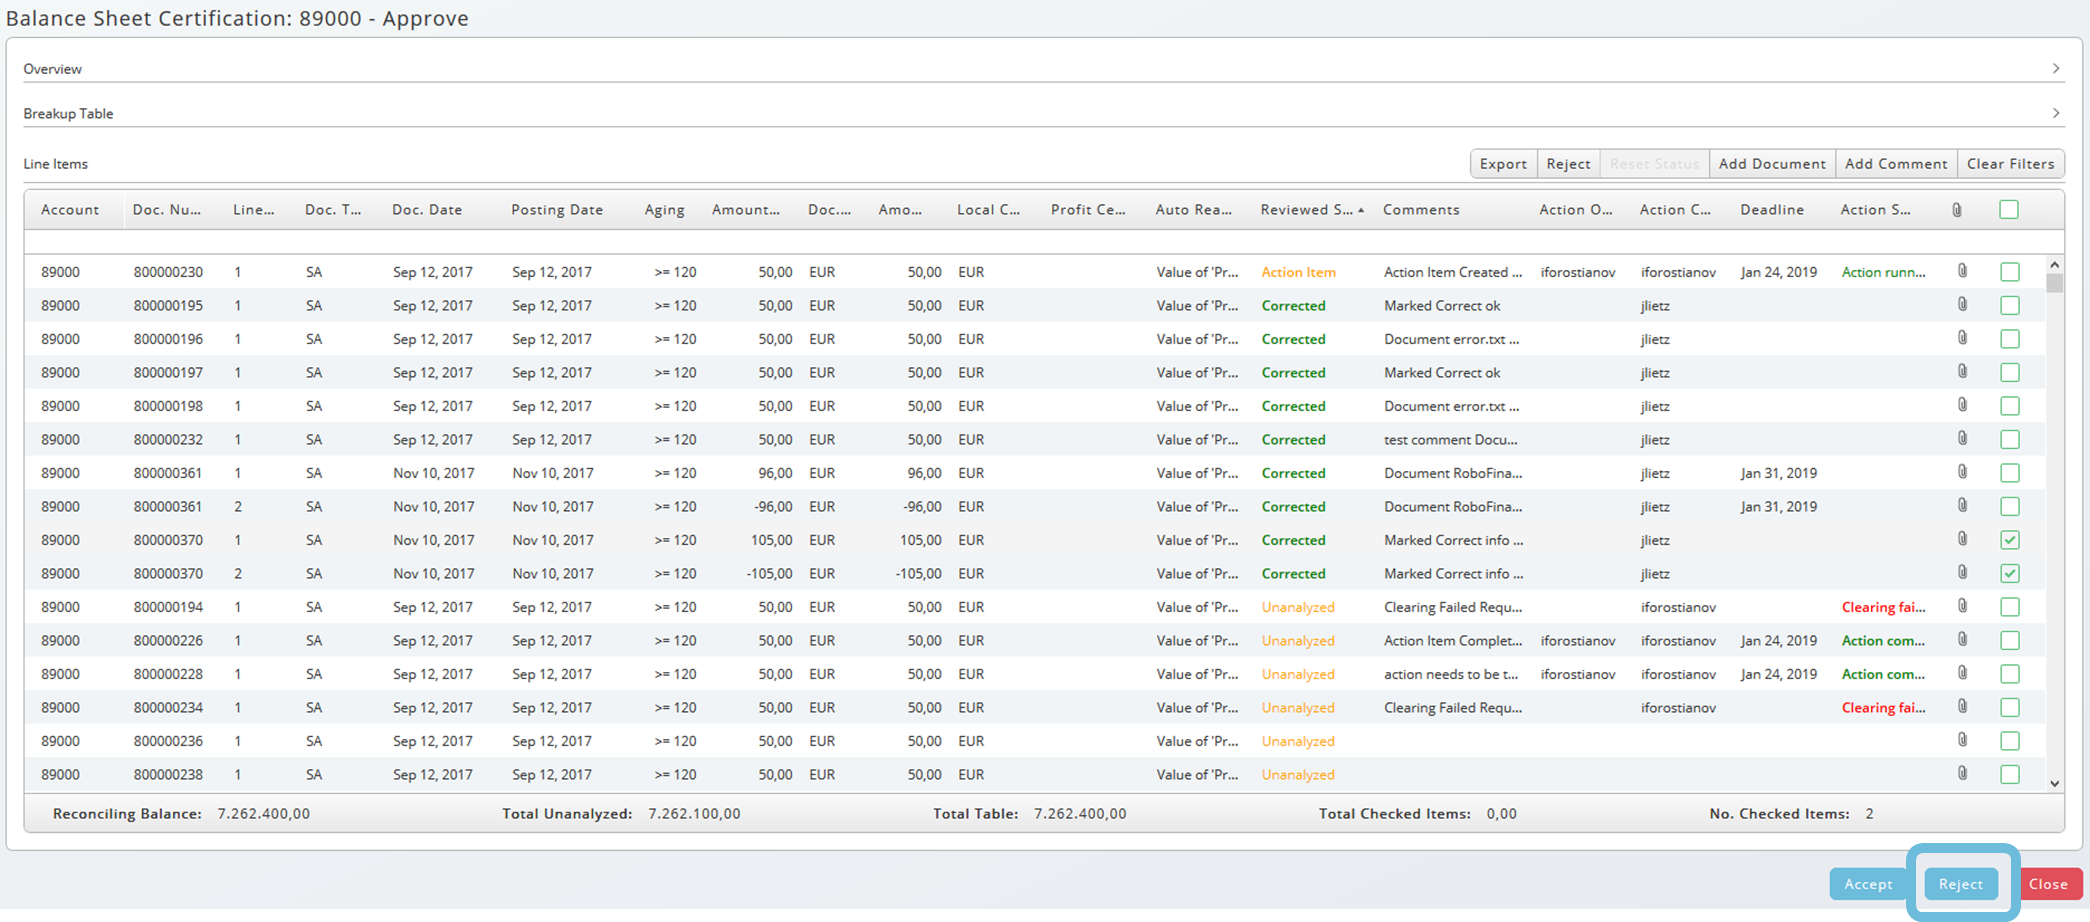
Figure 22: BSC Line Items Table - Reject Button
Any additional changes to the reconciliation or to the line items such as adding comments, documents, and so forth, will be visible and available to the preparer after the rejection.
Approve and Finalize the Reconciliation
If the reconciliation is okay, approve it by choosing the Accept button at the bottom of the Reconciliation Form.
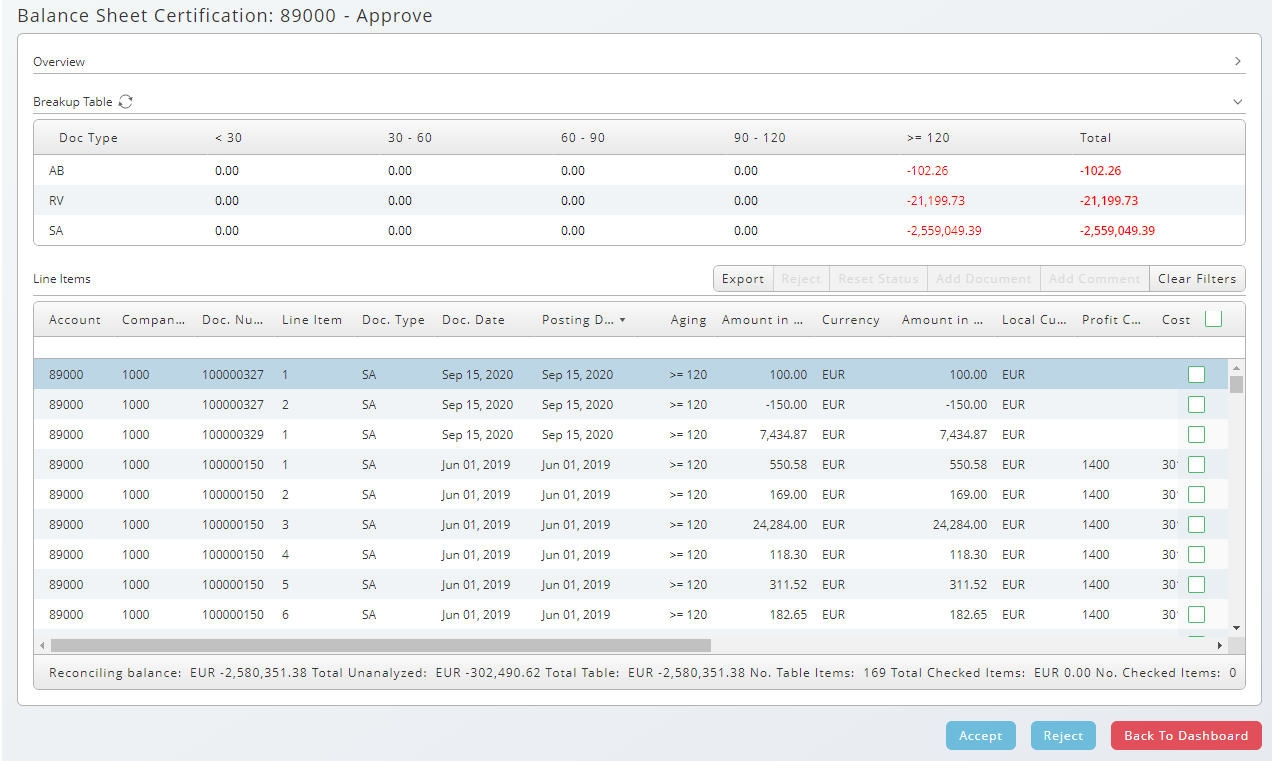
Figure 23: BSC Line Items Table - Accept Button
When the Reconciliation Form has been accepted, it is locked and a message stating that the page is read-only will be displayed at the top of the form.
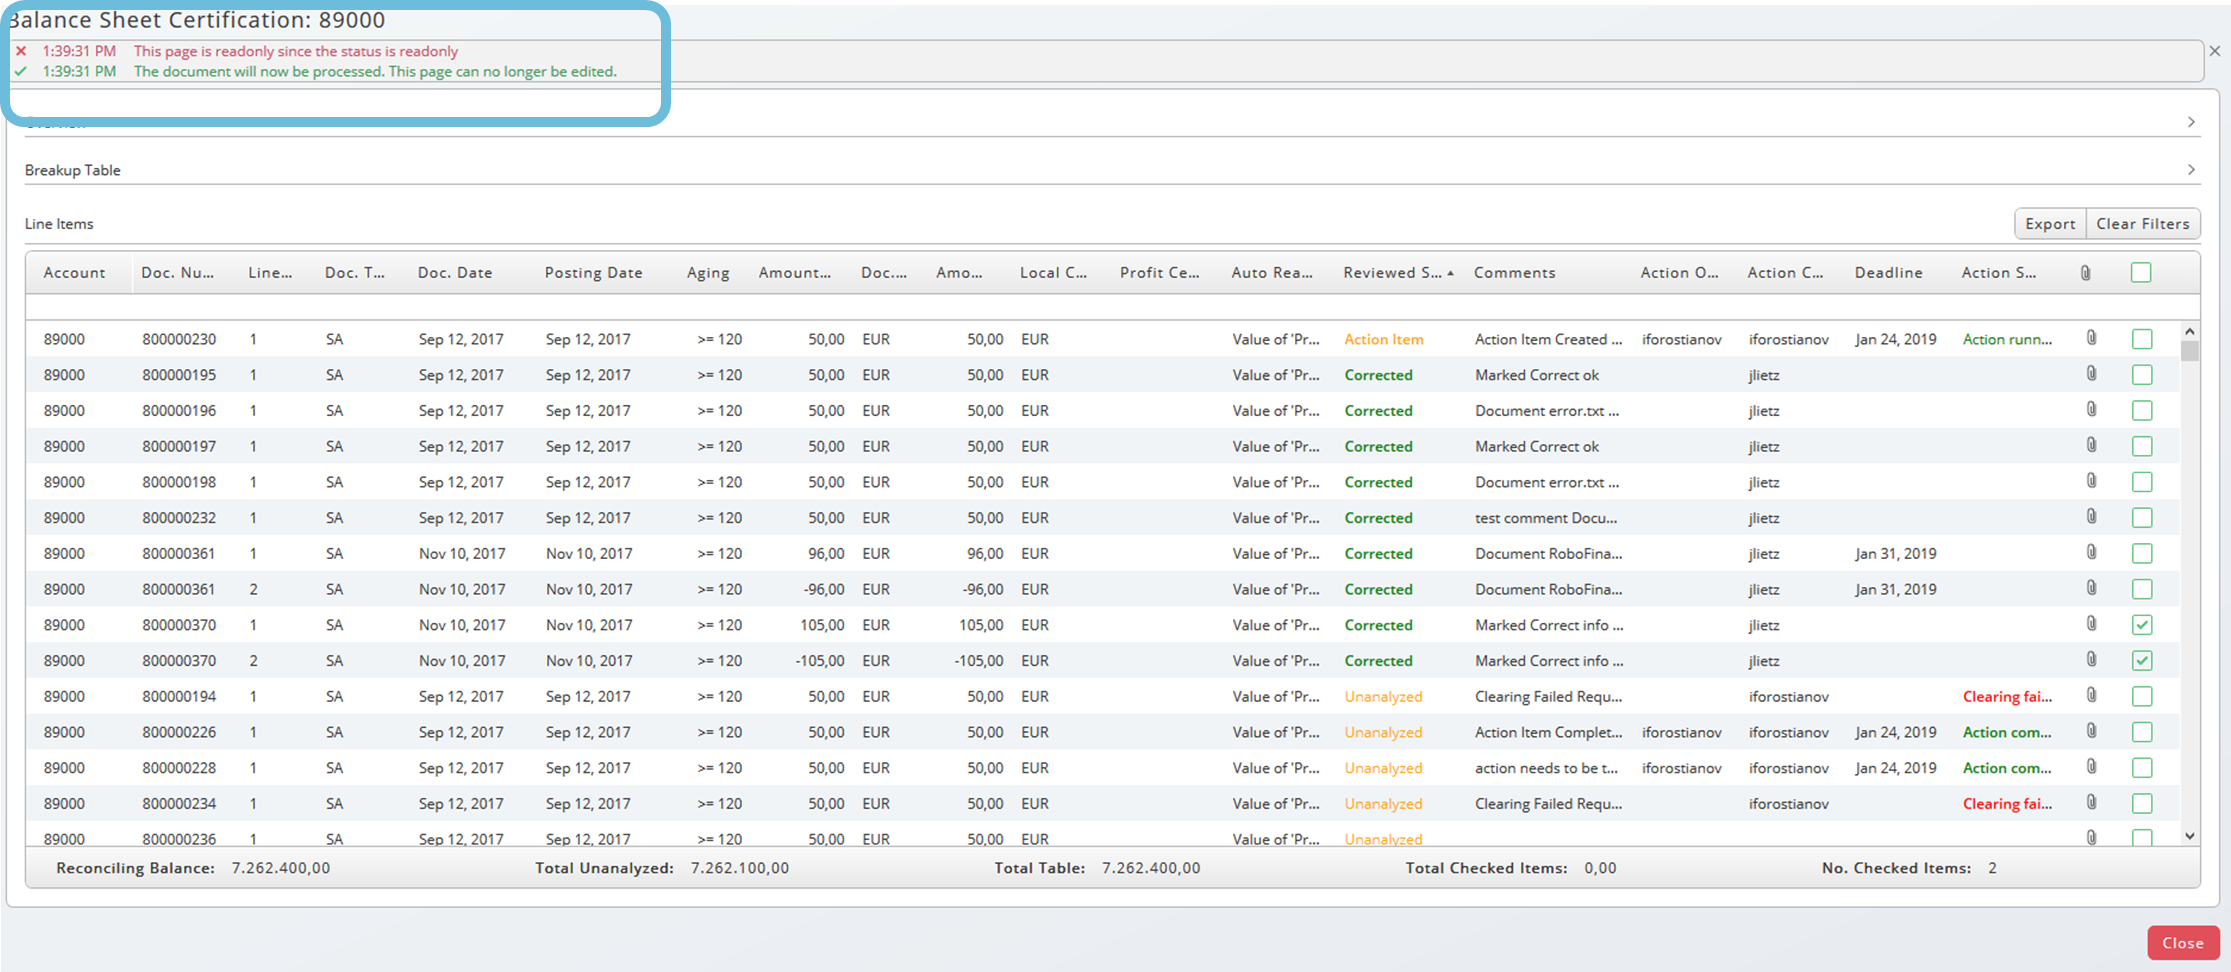
Figure 24: Read-Only Message
Using links to the Reconciliation Form after it has been completed will display a message that the page is read-only.
Overview - BSC Dashbord
During the preparation and review, both the preparer and approver have access to an overview showing individual actions and tasks that have been created. The visible columns can be adjusted by a column chooser. Use right-click to get the context menu. The visible column can be sorted by using drag & drop functionality. Certain periods can be selected, and you can add filters on each column to select line items by certain criteria. A tooltip appears when you hover over the blank line between the column title and the list of line items.
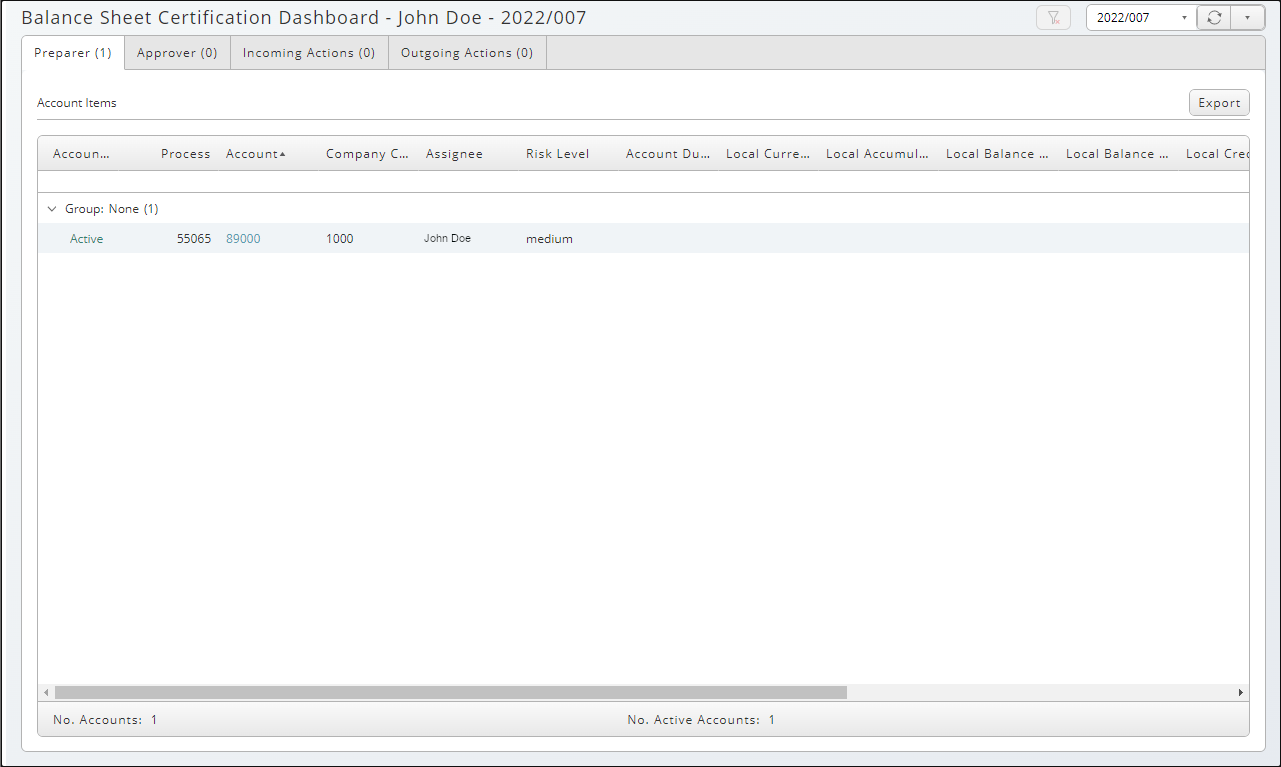
Figure 25: BSC Dashboard - Overview
The Incoming Actions tab shows graphs for the line item statuses and lists corrections and tasks that have been received.
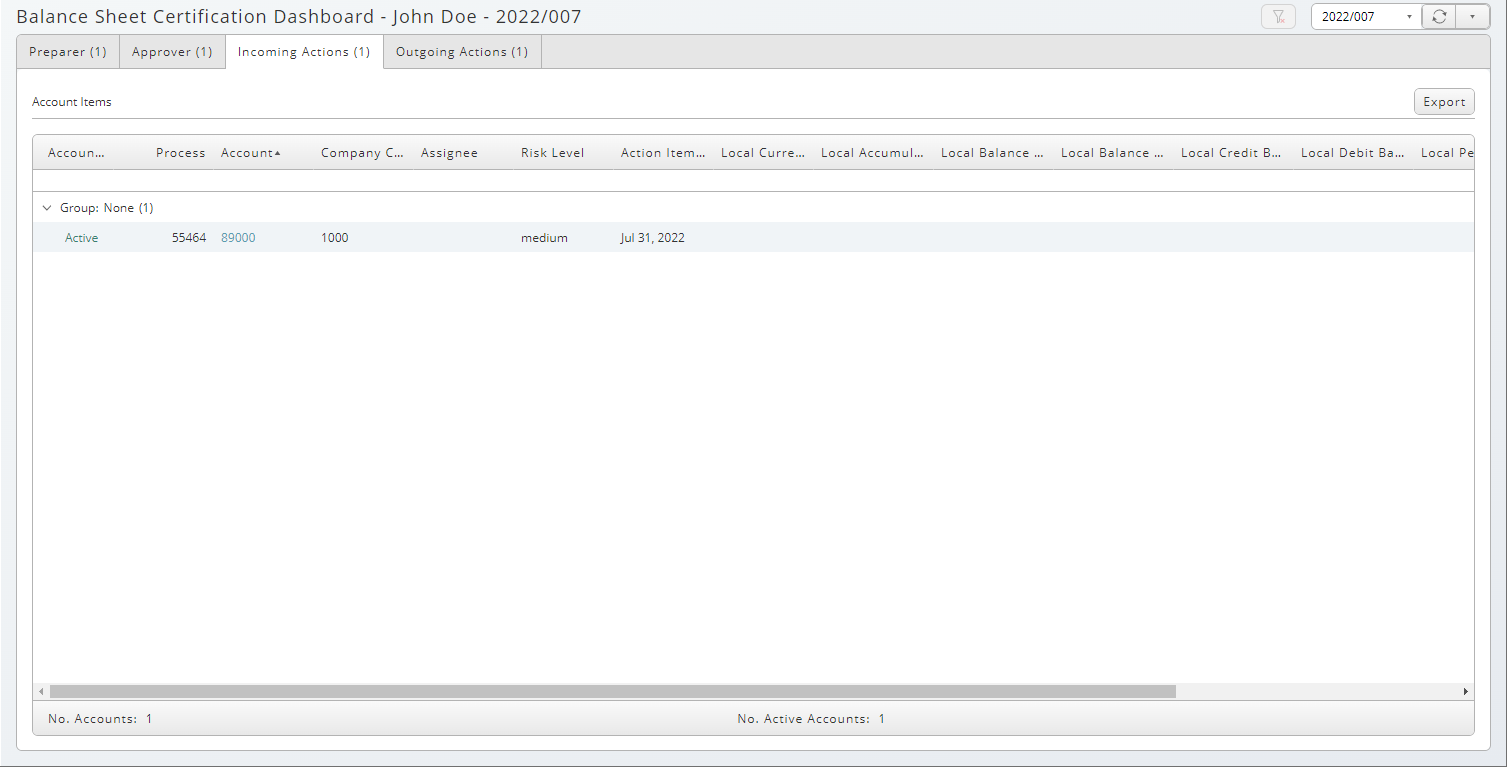
Figure 26: BSC Dashboard - Incoming Actions Tab
The Outgoing Actions tab shows graphs for the line item statuses and lists corrections and tasks that the current user has made.
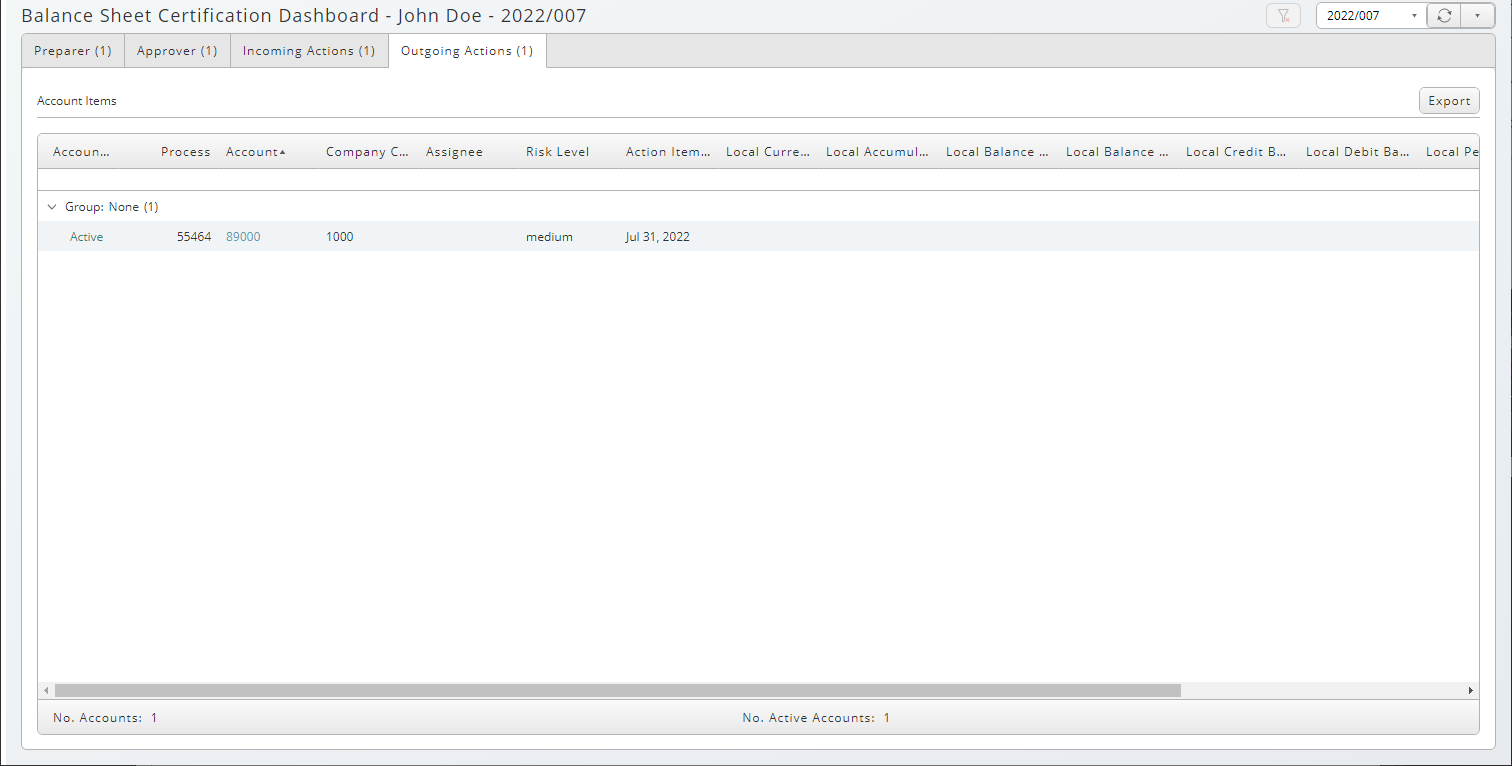
Figure 27: BSC Dashboard - Outgoing Actions Tab
You use grouping to group balance sheets by setting the Group (BS_ACCOUNT_GROUP) parameter.
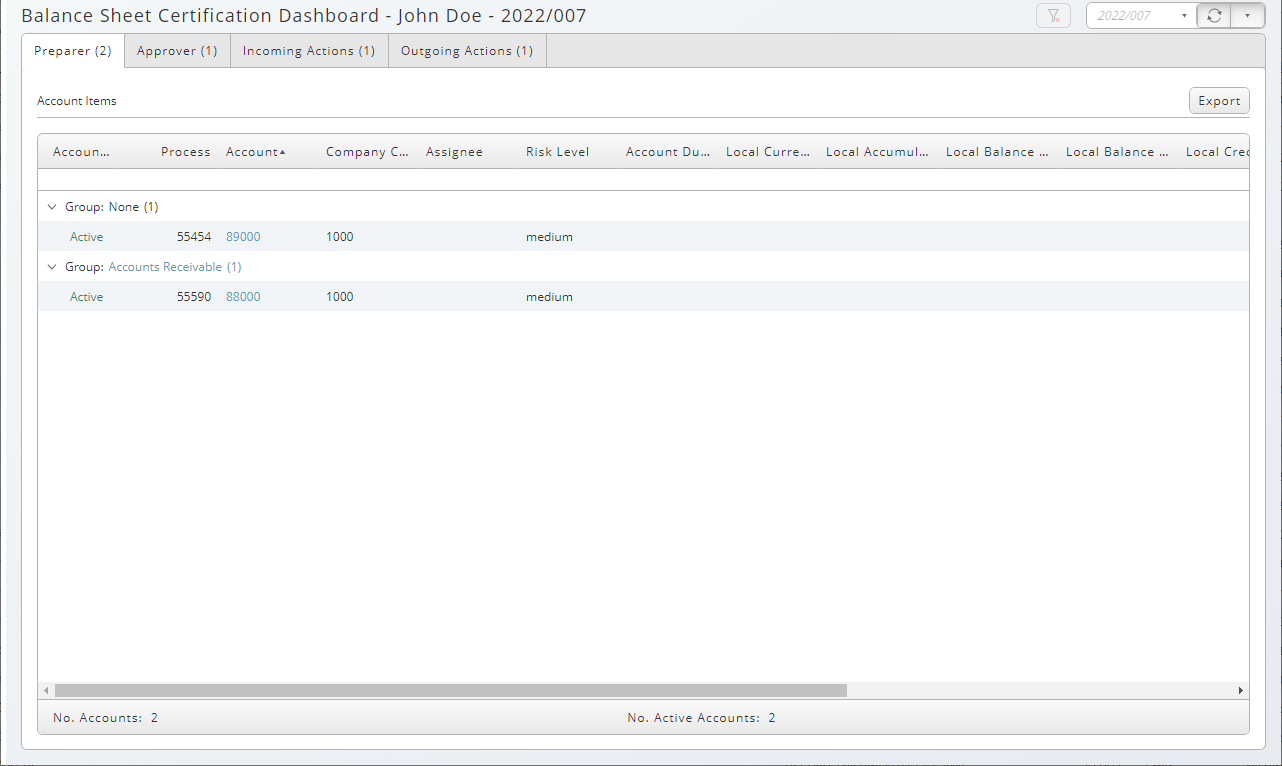
Figure 28: BSC Dashboard - Grouping balance sheets
A clickable link on the left-hand side of each line leads you automatically to the balance sheet. Click on button Back to Dashboard bottom right to return to the Dashboard view.

Figure 29: BSC line items
See Also
financeTopic
