 Single Sign-On Authentication Configuration
Introduction
Centralized user administration is key in organisations, both for ease of user management but also from security perspective. Best practice is to use Single-Sign On (SSO), providing the end-users with the convenience of only having to remember one set of credentials and the companies administrators with a single point of management and a way to ensure their corporate password policies are enforced.
Redwood can be configured to authenticate against an external security provider which supports the Security Assertion Markup Language (SAML 2.0) standard as defined by RFC 7522. SAML can be used to either directly integrate with, for example your Active Directory domain controller using Active Directory Federation Services, or through online middleware providers that support SAML 2.0+ with a publicly accessible metadata URL.
When using SAML Authentication, Single Sign-On will be enabled, which means that machines that are part of the domain can transparently login to Redwood solutions.
Single Sign-On Authentication via SAML
SAML (Security Assertion Markup Language) is an XML and HTTP based secure, industry-standard way to perform Single Sign-On (SSO) between online applications.
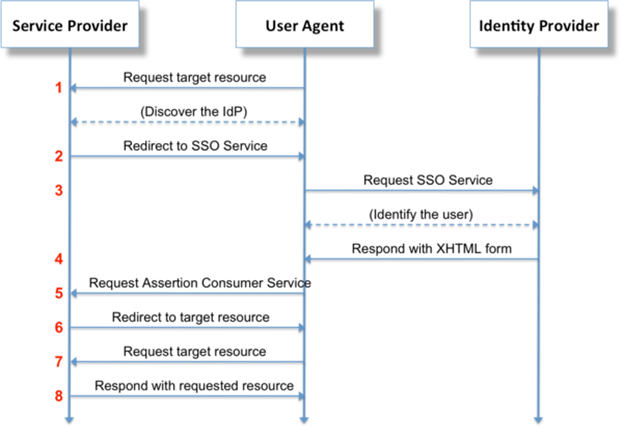
Figure 1: SAML protocol high level description
Configuring your Identity Provider (IdP) claims/tokens
We are compatible with all IdPs that both support SAML as well as offer a public metadata URL. Configuration of the IdP will need to be done by your IdP administrators and how this is done varies from product to product. The configuration should be such that the minimal required user information for the SSO integration is returned, which are the following items:
- Email address
- Display name
- Roles/groups the user is a member of
Before starting on the next section, ensure that your IdP team has:
- Created at least the initial access group that will contain the user who will perform the SSO configuration in RunMyJobs.
- Added that user to that access group.
How to enable Single Sign-On
Required Portal Privileges
Below Portal privileges should be taken into account when working on the SSO configuration.
SSO Administrators
- Can add/update/delete SSO configuration
- Can add/update/delete SSO access groups
Security Administrators
- Can update SSO access groups access
Start the Single Sign-On configuration
Log in to the Redwood Cloud Portal with an account that has 'SSO Administrator' privilege and navigate to Security/SSO in the navigation bar. The portal will automatically detect you do not have SSO setup and show you the below page outlining the steps to enable SSO. Domains are specified with @, the configuration name is only used in the URL's of the metadata and the SSO login URL.
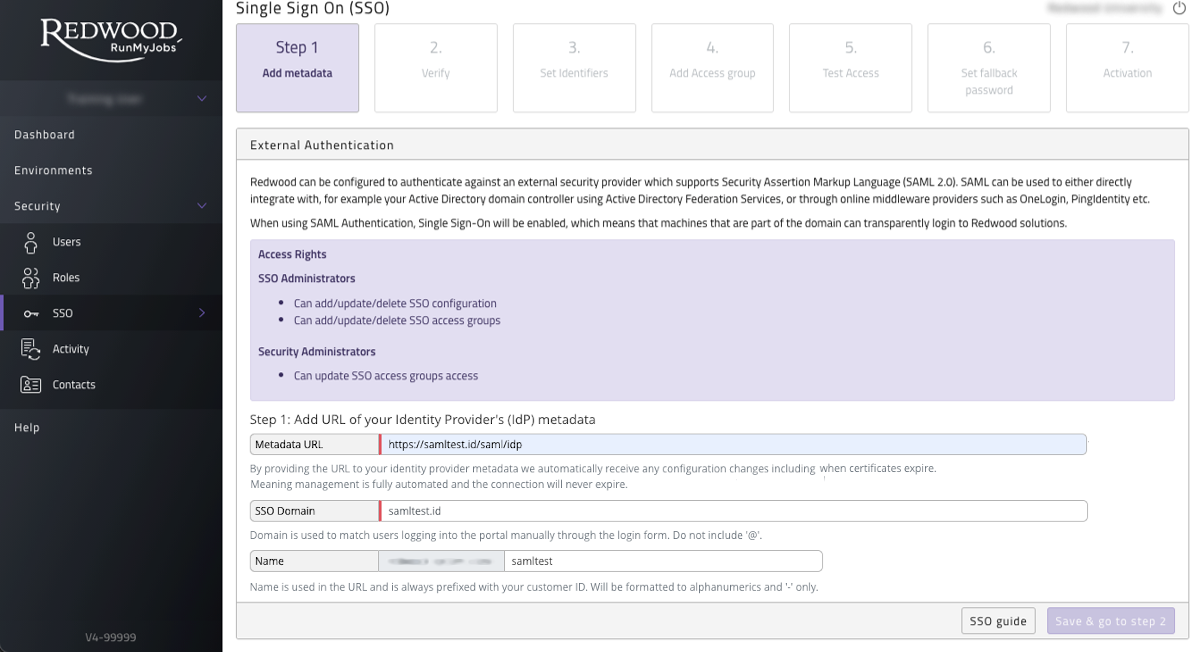
Figure 2: SSO Configuration start screen
Adding an Identity Provider (IdP)
The Metadata URL has to be obtained from your IdP, for example your Active Directory Federation Server (ADFS). Almost all IdP's have a public facing metadata URL, ask your IT department for this. Once you have obtained the Metadata URL, enter it in the input field and click submit. The portal will process the URL and process the metadata provided. If there are any problems the page will show them and explain what's needed.
Access to the Metadata URL will stay mandatory from portal.runmyfinance.cloud or portal.runmyjobs.cloud. This will assure constant availability as Redwood will then automatically renew the certificate and update changes done on the customer environment.
Uploading Redwood metadata to IdP
Copy Redwood metadata URL and send to your IT department to upload to your IdP. Claim rules for email, name & access groups also need to be set (see next step). We also suggest attaching this guide to the email you send to your IT department.
Some IdP's require an identity for RunMyJobs or Finance Automation, this will be runmyfinance.cloud or runmyjobs.cloud, respectively.
Setup an IdP Claim rule
The Claim rules/transformation rules that are required to be set with the name "NameID" are:
- Email - This will be used as your username
- DisplayName - Used for first name last name (outside scroll area in Figure 3)
- Groups - Used to filter access groups to set correct access
Other rules can be sent over and will be ignored.
Example: ADFS setup
Figure 3 shows the setup for the NameID rule in ADFS.
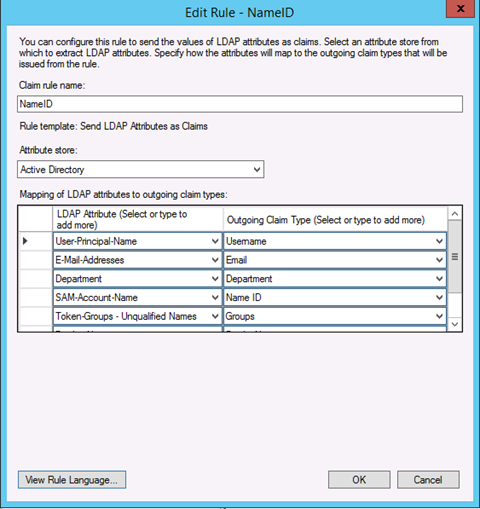
Figure 3: Setup for the NameID rule in ADFS
Verify Setup
Once your IdP is configured you can verify by clicking 'Verify Authentication' button.
note
This only verifies the handshake between Redwood and your IdP is correct - not the claim rules setup.
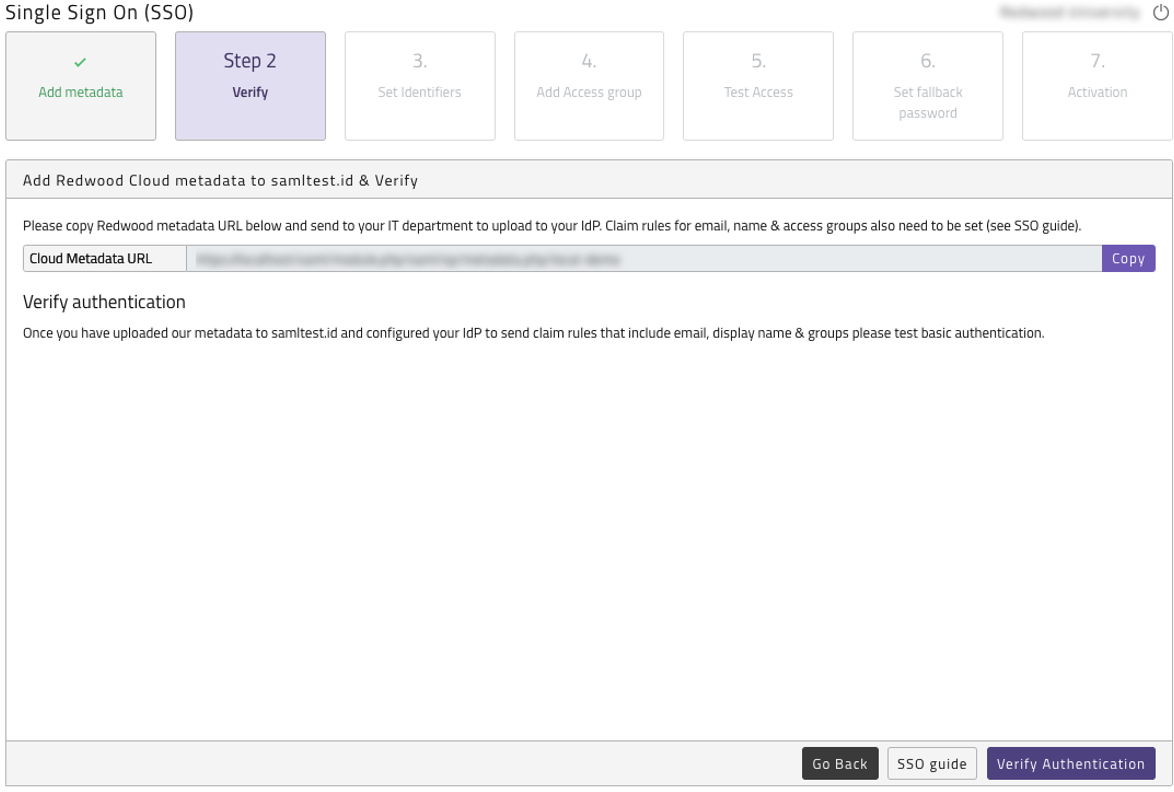
Figure 4: Verify Authentication after IdP is uploaded
Set Identifiers
Once claim rules are set on your IdP please click on the "Set identifiers" button shown in Figure 5.
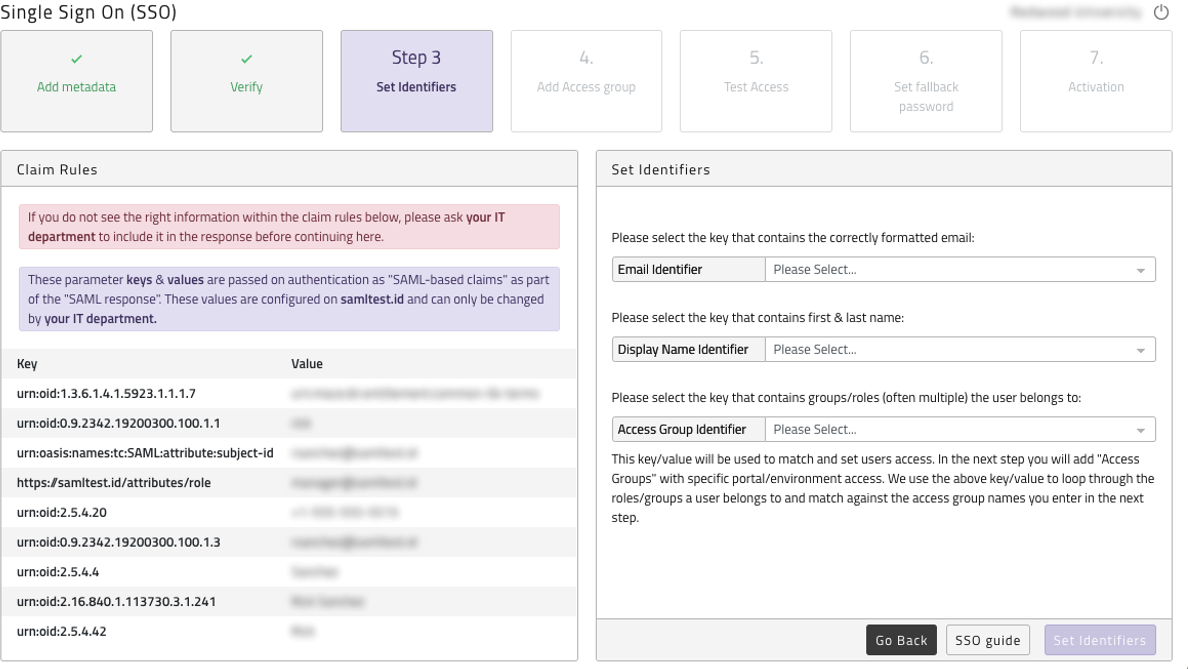
Figure 5: Response from IdP after setting identifiers
Figure 5 shows the full response from your IdP on the right-hand side. When blank, your IdP has NOT set any claim rules and these are required. Please review previous step and ask your IT team to set the claim rules as described.
On the left side is where you need to select which attributes passed from your IdP you want to use for each value. Select which attribute from the response you want to use to map to create users: email, name & access group. If a logical value is missing, you need to ask your IT department to add the claim rule for that value. You are able to re-update identifiers at any point after this save but all identifiers must be set.
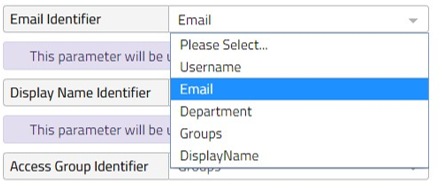
Figure 6: Map attributes to create users
Adding an Access Group
Once identifiers are set you need to add a new access group. You can add as many access groups as you require, and you need to select the Matching Method.
What are the matching methods?
- Merge Access (Default): If a user matches multiple access groups all will be linked to the user. We then build the users access by merging all groups access levels. If multiple groups have access set for the same environment the group with the highest access value that is assigned to you will be taken. For example, if you match two groups, one with 'Operator' access and one with 'Administrator' you will be granted 'Administrator' access.
- Best Match: If a user matches multiple access groups the access group with highest access will be used and the other groups will be ignored. The order of access groups is determined on the Total Access Value a Group represents. The access value is based on the sum of access granted to that Group. The Group with the highest access value that is assigned to you will be taken.
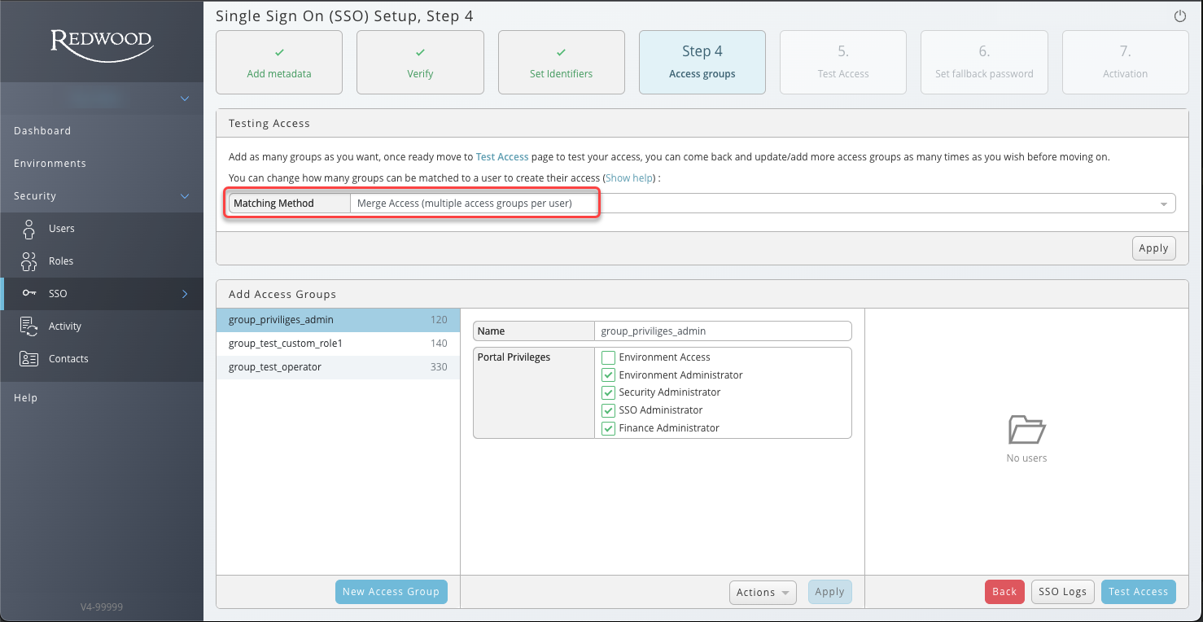
Figure 7: Add new access groups to your SSO configuration
The 'name' value must match one of the items passed in the access group identifier.
For example: We have set our access group identifier to "Groups" ADFS passes a list of values set per user: ['Domain Users','RMJ_Users','SG_IT',....] for this example we created a ADFS group 'RMJ_Users' and will match this one to create the correct level of access for those users. You can choose to use current groups set up in your IdP (for example department groups) but we recommend creating new groups for each level of access you wish to grant to your users.
Once this is done you can "check" the relevant Portal Privileges for this group.
All users who match this access group will have the exact same access. Access level can only be changed at group level and all users will be updated to match.
note
If a user matches multiple access groups the access group with highest access will be used and the other groups will be ignored. We show which users belong to which access group and which access group controls a user's access on the relevant pages.
The order of access groups is determined on the Total Access Value a Group represents. The access value is based on the sum of access granted to that Group. The Group with the highest access value that is assigned to you will be taken.

Figure 8: Total access value
Single Sign On (SSO) also controls custom role access. When adding or updating SSO access groups you will see the option to select any active custom roles you have created. If selected any users controlled by the access group will be added to the custom role. You can add multiple custom roles to an access group and a custom role can have multiple access groups linked to it.
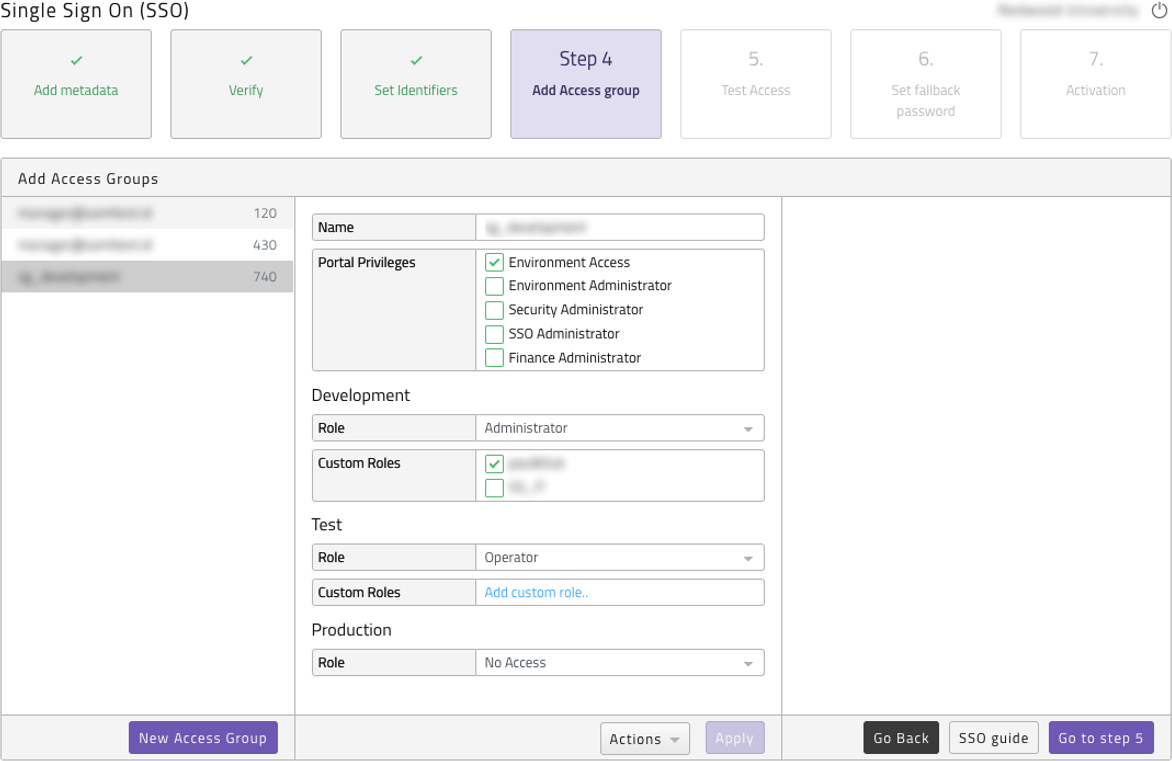
Figure 9: Adding more access groups
Test Access
Once access groups are added you are required to test access, please click on Step 5 - Test Access button - Activating SSO is NOT required for the test. Please log into your IdP with the user you wish to test. You will automatically return to the test page where you will see the response from the IdP, the best match access group found and the resulting user that would be created. Please note no actual user has been created as this is solely a test.
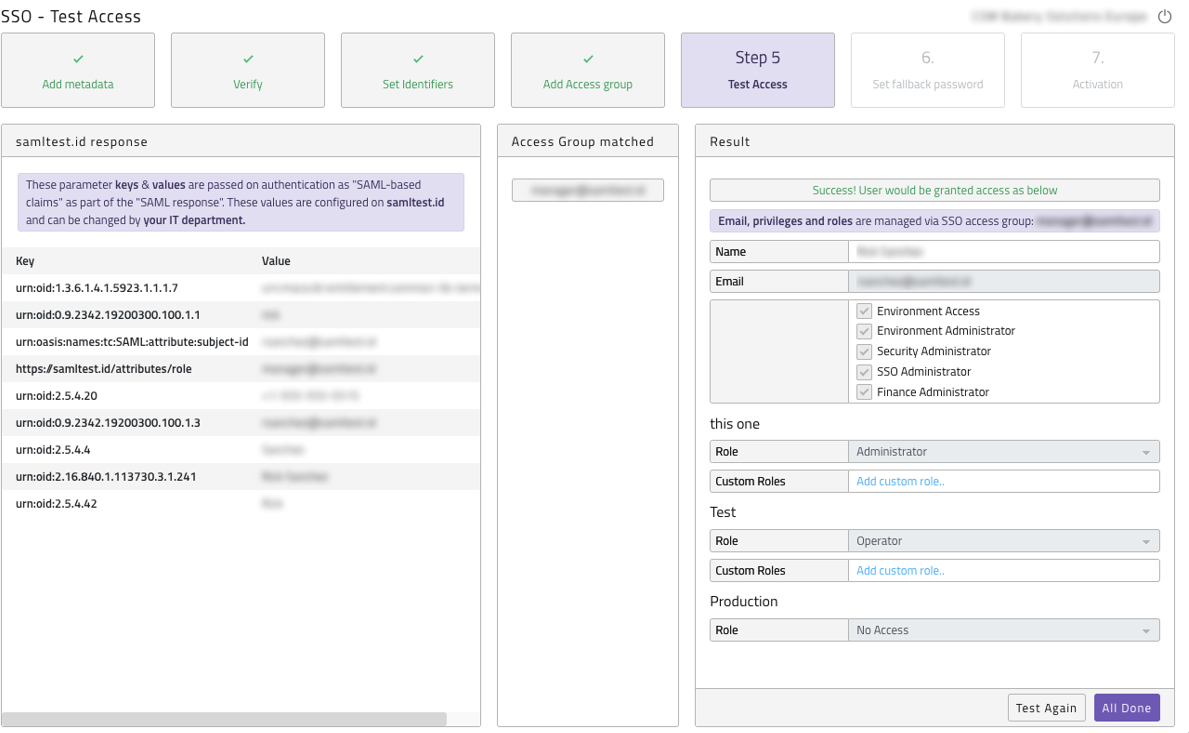
Figure 10: Test SSO access (not activated yet)
Once you have tested a user with SSO Administrator access and are happy with the results, press the All Done button. If you do not see a result similar to the screenshot above you need to review your configuration, instructions on the page will explain what you need to do. Press the Update access group button. Please review environment access level matches what you expect. The access groups work on a one-to-one best match.

Figure 11: Update access group
tip
If users have access issues after activation, simply login with the SSO Administrator user to change the configuration as needed.
Set fallback password
We recommend you set a fallback password that can be used if your IdP ever goes down and store this securely somewhere, accessible to authorized personnel, only.
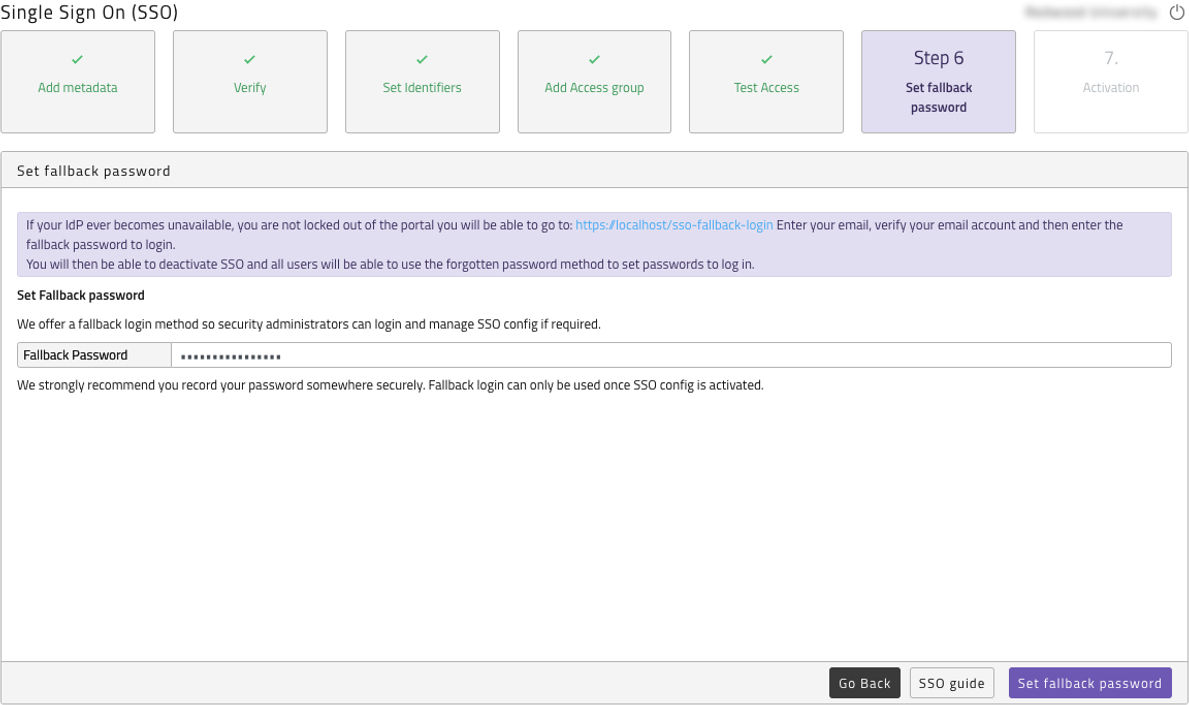
Figure 12: Set SSO Fallback password
Activating SSO configuration
Within the Activation section you will be presented with information regarding the process and the terms of activating SSO, please read through them and tick the Activate checkbox. Then click Activate. SSO will now be active.
note
Any non-SSO users that are linked to the domain (non-system users that you created in the portal prior to having an SSO configuration, that are not SSO Administrators), will be deleted upon SSO activation. Any deleted users will be re-created automatically once they login, via their company SSO.
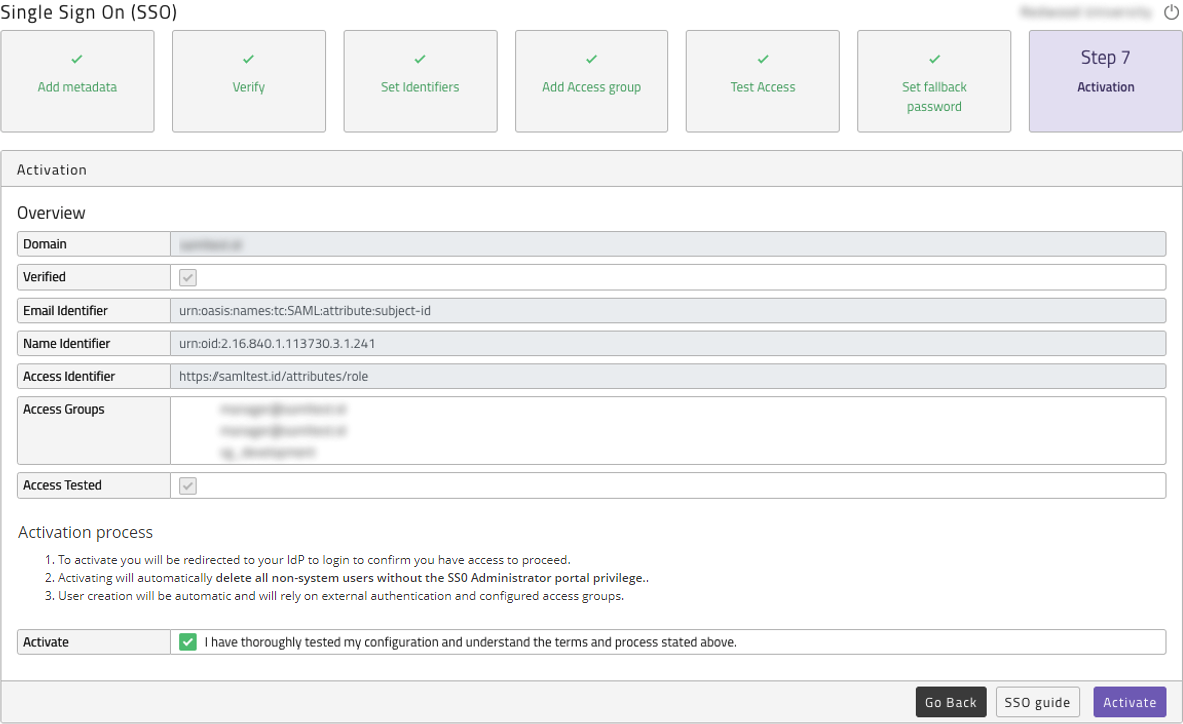
Figure 13: Activating SSO
Deactivate, reactivate or delete SSO configuration
Once deactivated you can either re-activate the configuration which does require SSO with your IdP to be working as we test access before activation. Or you can delete the configuration and start again. This second option will remove all access groups and all users linked to those groups except for SSO Administrators.
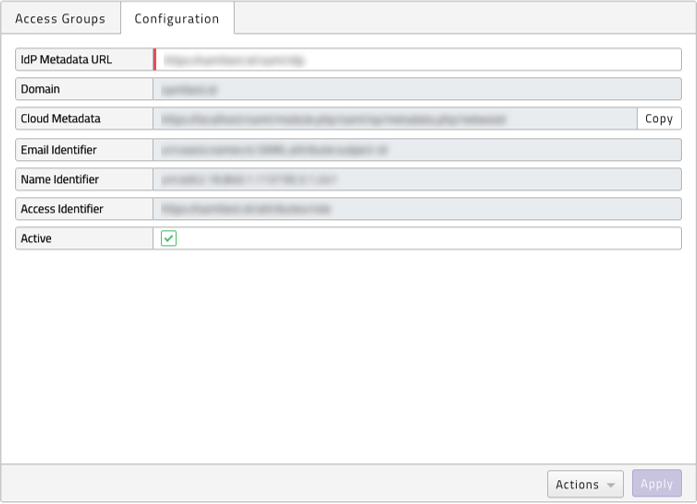
Figure 14: Deactivate SSO configuration
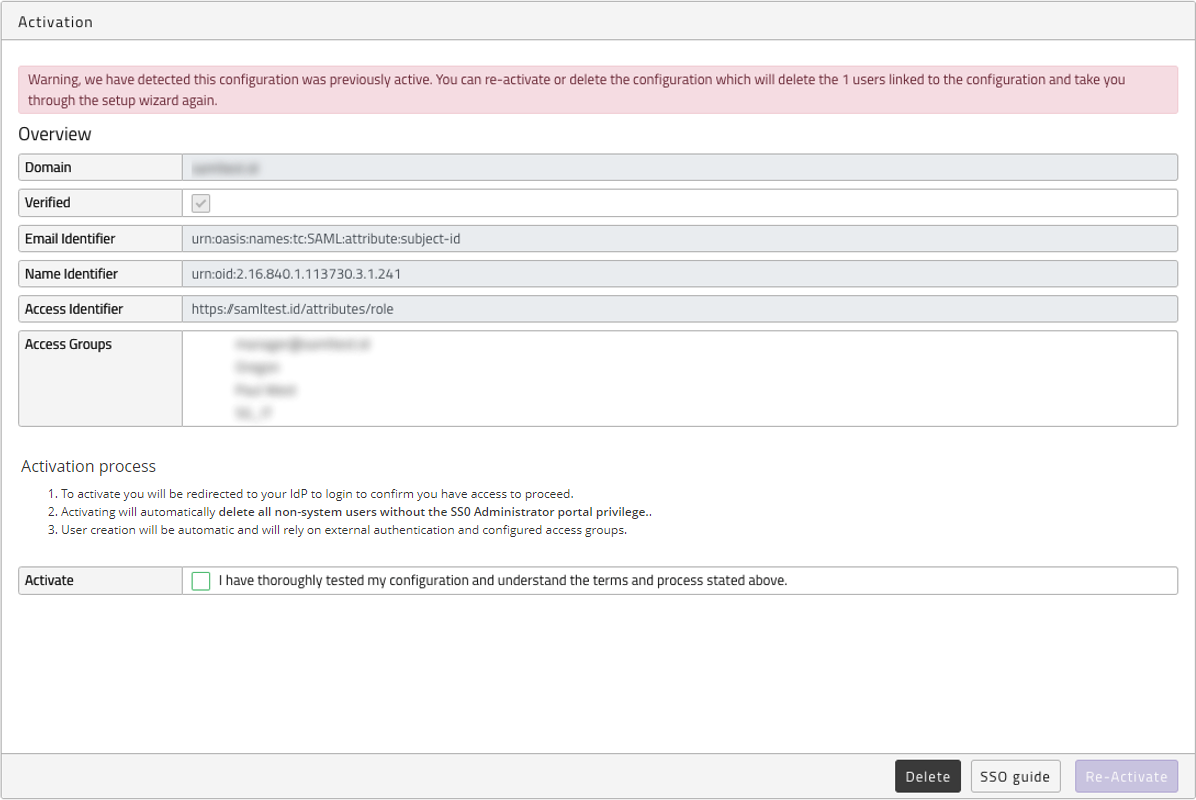
Figure 15: Delete or Re-Activate SSO configuration
Fallback Login
If your IdP becomes unavailable, you are not locked out of the portal you need to go to:
https://portal.runmyjobs.cloud/sso-fallback-login
https://portal.runmyfinance.cloud/sso-fallback-login
Enter your email. A new verify code will be emailed to you. You need to enter the verification number and then enter the fallback password to login. You will then be able to deactivate SSO and all users will be able to use the forgotten password method to set passwords to log in.
If you do not know your fallback password raise a support ticket and they will be able to reset it for you.
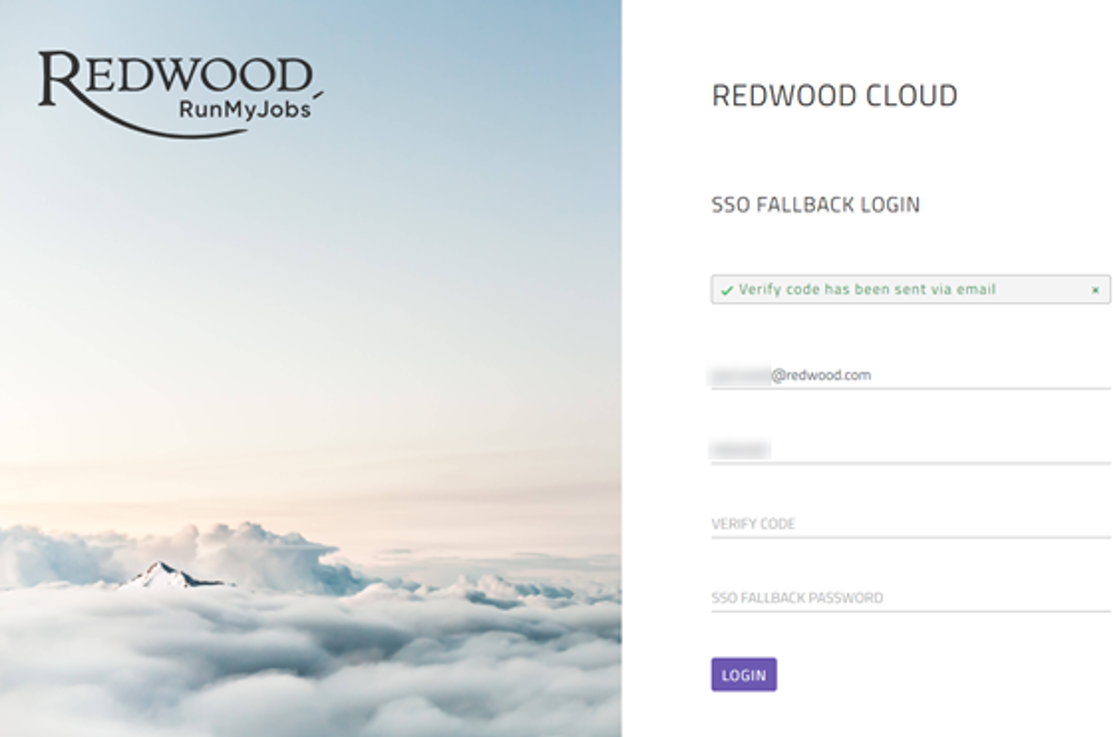
Figure 16: Set SSO Fallback login
Adding additional SSO configurations
Accounts on the portals can now have multiple SSO configurations per account. This allows you to add additional identity providers from other parts of their organizations that use separate domains.
This new feature can also be used to migrate from one identity provider to another by allowing you to fully configure and test the new configuration before switching - even if they both use the same domain.
- Rules - There can only be one configuration active per domain but multiple domains are allowed.
- Security - You cannot activate a configuration for a domain that is already active. You must first deactivate the previous configuration - only the owner of the active configuration can do this.
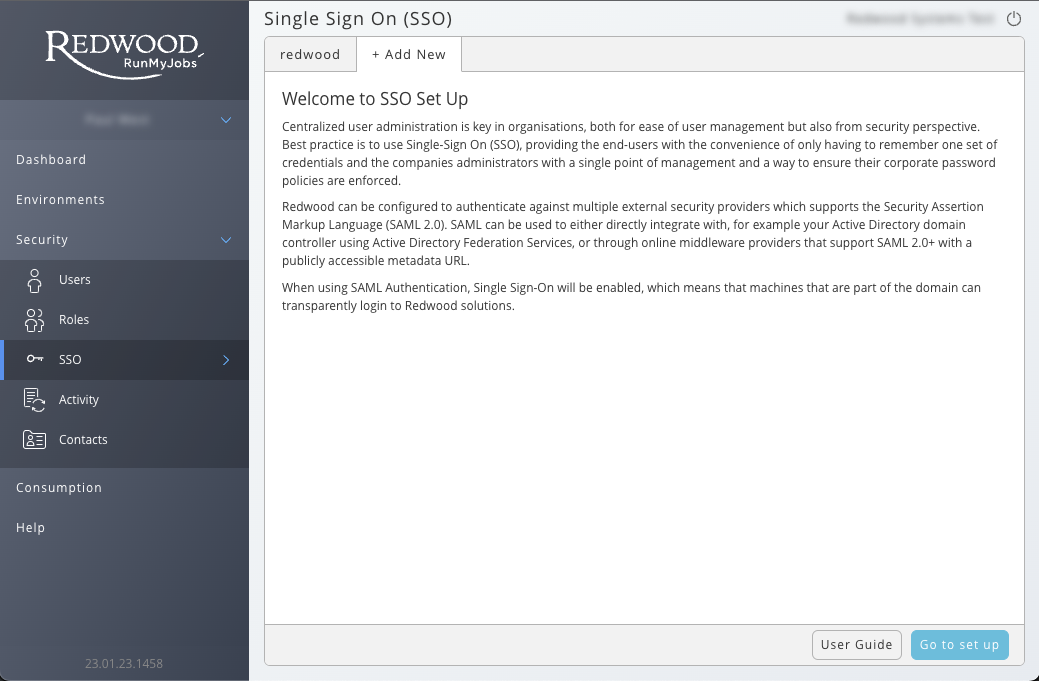
Figure 17: Add an SSO configuration
Recommendations
- A user should belong to one IdP not multiple.
- An IdP/SSO configuration should not be related or linked to a single environment but to the whole account.
- Access groups should control environment access, Example:
redwood-batch-groups-dev,redwood-batch-groups-test,redwood-batch-groups-prod
See Also
cloudTopic
