 Managing Users and Roles
Introduction
Use of the Redwood Cloud based process automation service is strictly controlled, with user ID and password credentials required to gain access to a customer account. Different types of users and roles further control the functions available. This document provides an overview of the different user types and roles provided by Redwood.
SaaS Portal User Types
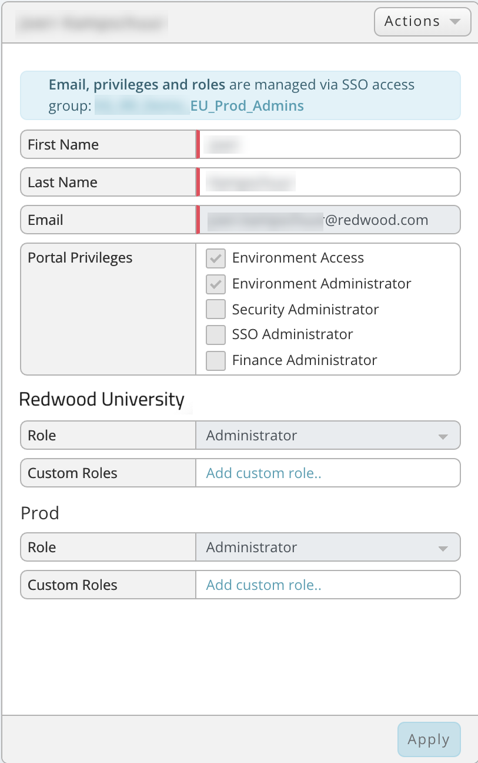
Figure 1: Setup User Interaction
Users can be added on the Redwood SaaS portal and can be setup with the required Portal Privileges per environment.
- Environment Access - Provides basic access to the portal with environments and the Help section.
- Environment Administrator - Provides access to the environments section where a user can edit environment details and view activity logs.
- Security Administrator - Provides access to only the security section, enabling them to add/edit/delete users, custom roles, contacts, view activity logs and manage existing SSO groups.
- SSO Administrator - Provides access to the Security/SSO section to manage the SSO configuration and add new SSO groups.
- Finance Administrator - are NOT counted against your user allowance as they cannot access environments. They have access to the financial/contract section.
System User - System users allow you to define a technical account which can be used for API access only.
- Allows you to create an unnamed user, which cannot login to the UI.
- Defined in the Redwood user management and bypasses your SSO configuration.
- Must comply with the Redwood password complexity rules; however, the password never expires.
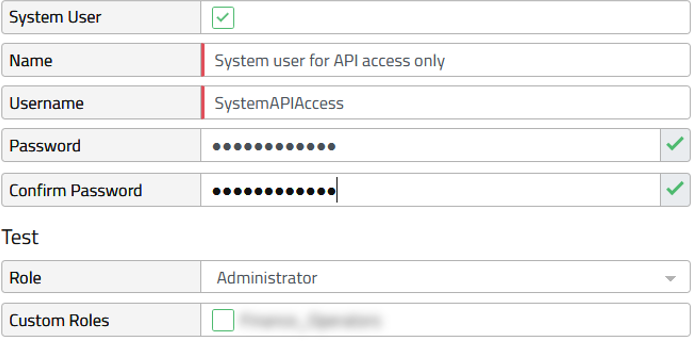
Figure 2: System user
Password Policy
Account will be locked after five failed login attempts with an unlock link sent to the user's email.
Password rules are the following:
- At least one lower case
- At least one upper case
- At least one number
- At least one symbol
- At least 12 characters
- Not a common password
New passwords cannot be the same as any of your previous 10 passwords.
The password policy only applies to non-SSO user accounts.
Session Inactivity
The default timeout is set to 30 Minutes, users with the Security Administrator role can navigate to Security > Users > Company Settings to change the default. Valid values: 5 Minutes, 15 Minutes, 30 Minutes, 45 Minutes, 1 Hour.
User Inactivity
Any users created via an SSO configuration will be removed after 90 days of inactivity. Access will not be blocked as they can simply log in and be re-created automatically if they have access. This is a security measure for when a user leaves a company as there is no way for the IdP to inform the portal a user has left. This also applies to Redwood Professional Services accounts should you have granted them access to your system for support or consultancy work, for example.
SSO User Licenses
You configure access rights in your SSO, every user that has access to the dashboard and that successfully logs in is counted towards the license. If you wish to remove the user from the license count, you must remove access in the dashboard. If you do not remove the user from the SSO access groups, the user can log in again and will count towards the license once more. Users that have been removed after inactivity do no longer count towards the license, if they are still in the access groups, they will be able to log in and will count towards the license, once more. No synchronization is performed with the SSO system to find users for which access has been removed from access groups and still have an account - a user that has been removed from the access groups will not be able to log in, however, continues to count towards the license until the user attempts to log in, gets access removed by an SSO administrator, or gets purged following inactivity.
Finance Administrators do not count towards the license, provided they do not access any environments.
Portal Privileges
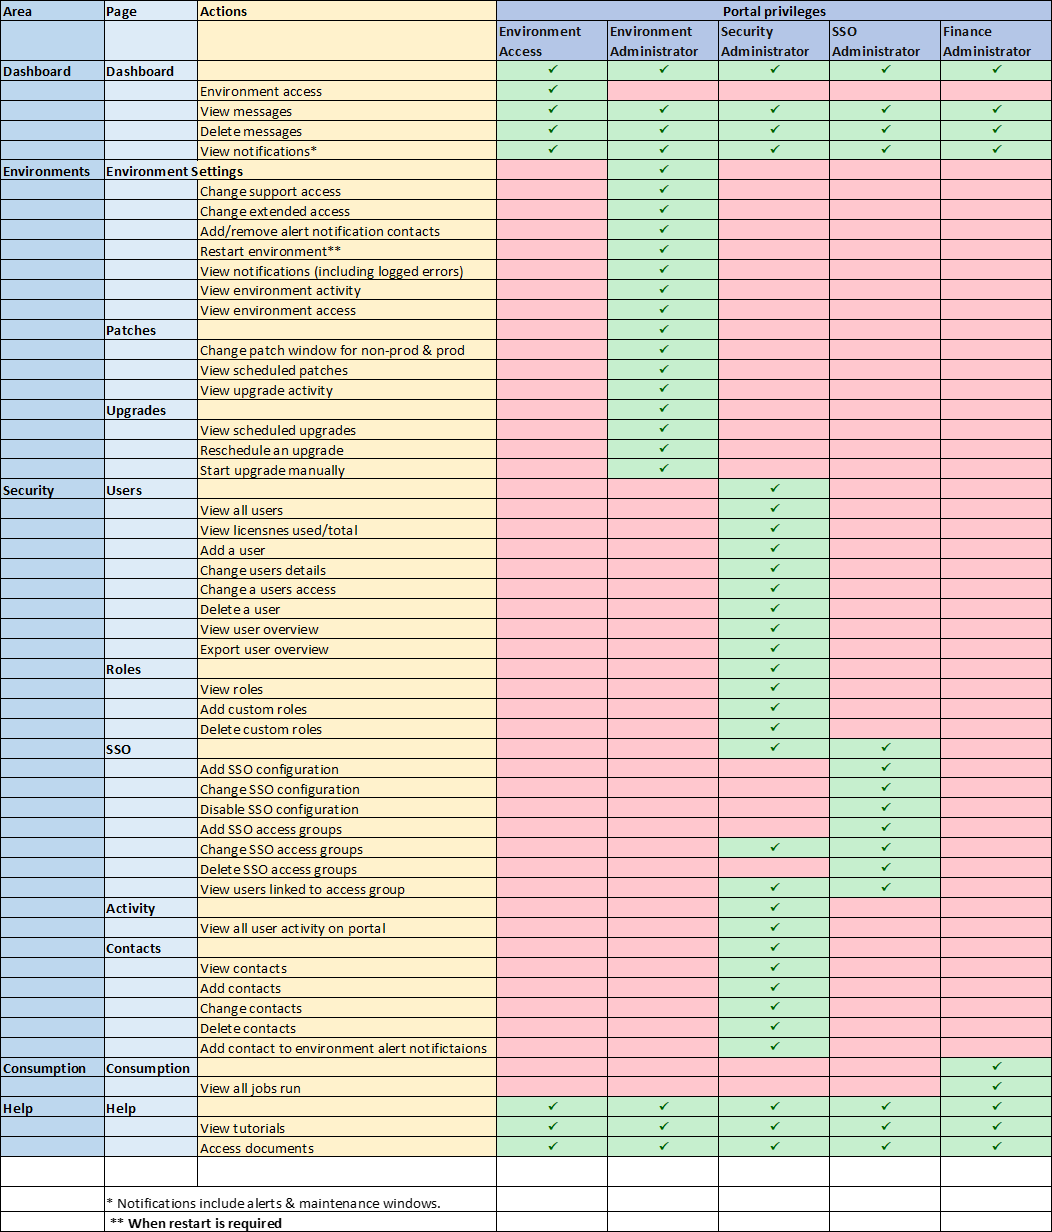
Figure 3: Privilege matrix
Standard Product Roles
Customers will get access to 3 environments: 'Development', 'Test' and 'Production' (note that the names of these environments can be changed by Environment Administrator users if required). Additional environments can be purchased when necessary. Contact your Account Manager for more information. Any users created can be granted one of five standard levels of access (or roles) to each environment separately, irrespective of any Portal Privilege. The standard roles provided are:
- No Access - Users with 'no access' to a given environment will not be presented with a 'Connect' button for that environment in the Redwood SaaS dashboard, they cannot access it.
- Login - Can connect to an environment but is only able to view or interact with objects via custom roles.
- Viewer - Has view only access the environment. Cannot submit workload or create and edit objects.
- Operator - Has access to functions required for day-to-day operations of the environment. Can submit and monitor workload, can stop and start connections to managed environments. Cannot create or edit any objects
- Business - Provides access or functionality to create business user specific screens.
- Administrator - Has full access to administer the environment. Can create, edit and delete objects, can monitor and submit workload, can stop and start queues/connections, can create connections to managed systems and can administer object level security. Except for the secure gateway configuration on the process server.
- Cloud Administrator - This role has the same access as the Administrator, additionally this role can manage secure gateway configuration.
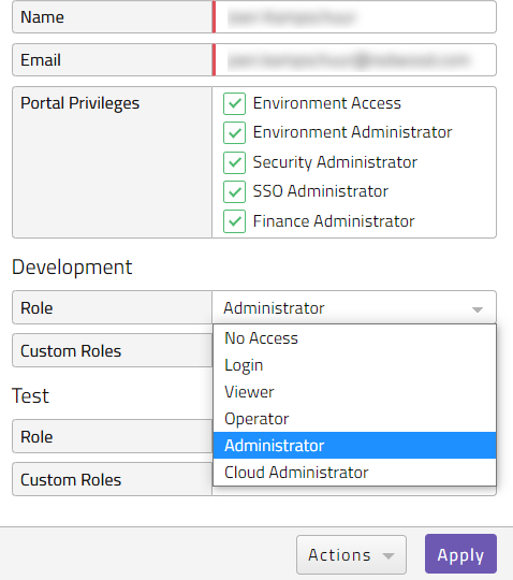
Figure 4: Standard Roles
Different roles can be granted for each user for each of the environments. See figure 4, in which this user has been given Administrator access to the Redwood University environment so that he can develop objects and submit tasks. He currently has No Access to the Prod environment.
The roles granted for each environment are not related to the type of Portal user (privileges). Therefore, it is possible to have a 'User' that is granted Administrator role for the Production environment even though that user has no access to create and modify other Redwood account users, which is done via the Portal. Similarly, Security Administrators could have no access to one or more of the environments.
note
When allocating roles to users, be aware that subsequently changing them can have an impact on scheduled workload. For example if a user with 'Operator' access submits a process with a recurrence to re-run every week, if that user is then
changed to a 'View' user these recurrences will fail because, at execution time, they will attempt to run under the privileges of the user that submitted them and that user no longer has submit capability. When you experience this, use the System_ChangeOwner process definition to change the owner of the recurrence. Perform a dry run first to ensure you have selected the correct objects to change.
User Management
Users are managed in the Portal under Security > Users. This page has 2 tabs, both show a filter pane on the right which is persistent when switching tabs. This allows you to easily manage a big number of users. When SSO is configured, adding users to groups is managed in your user management system. SSO users are added as soon as they access the Dashboard and count towards the license. User privileges are synchronized each time they log in, are not automatically removed when you remove them from your SSO system or remove their access. Inactive users will see their account, not their privileges nor their access, removed after 90 days. They will be able to login again, provided they still have access according to the SSO system.
- Update tab Here you can assign user privileges or (custom) roles to users. When SSO is configured adding users and to groups is managed in combination with your user management system. It also allows you to quickly find all login activity of this user under the Actions button.
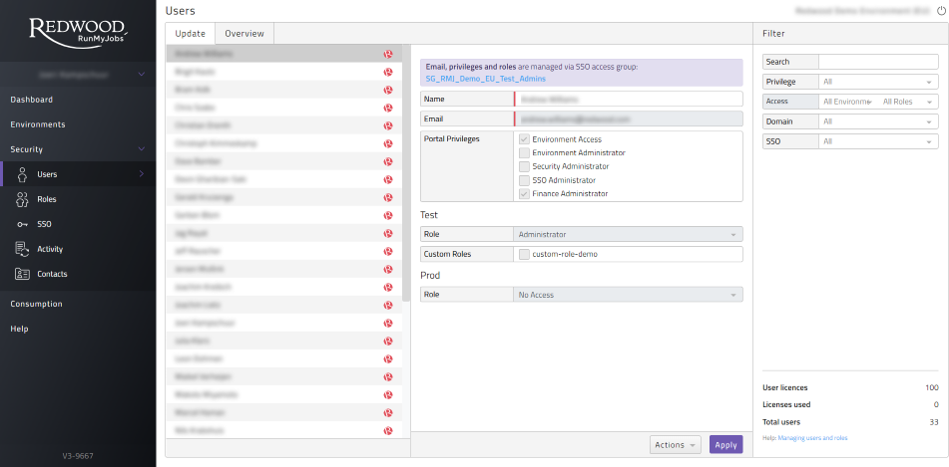
Figure 5: User management tab
- Overview tab This tab allows you to run reports and easily identify the needed portal privileges for the users. Additionally, you can export this report to CSV.
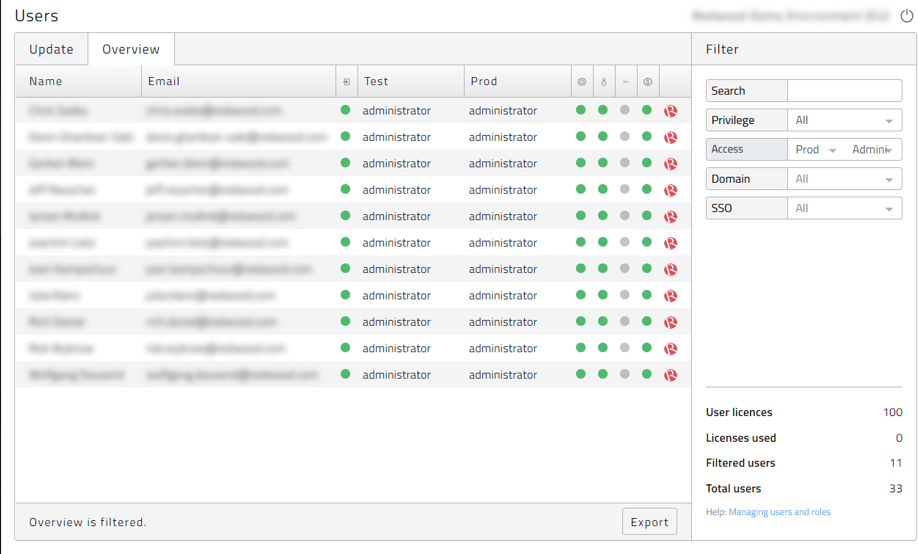
Figure 6: User overview and reporting tab
Custom Roles
This feature allows Redwood (Security) Administrator users to create any number roles. These 'Custom Roles' can then be granted to individual users on an environment-by-environment basis. For example, a custom role called 'Stock Update' could be created. Once this is created individuals, or groups of users with a given standard role, can be granted access to this new role on a per environment basis.
Actions in the Portal
- Start by accessing the 'Security' area of your Redwood SaaS Portal. Then select the 'Roles' option and click the '+' (Figure 7).
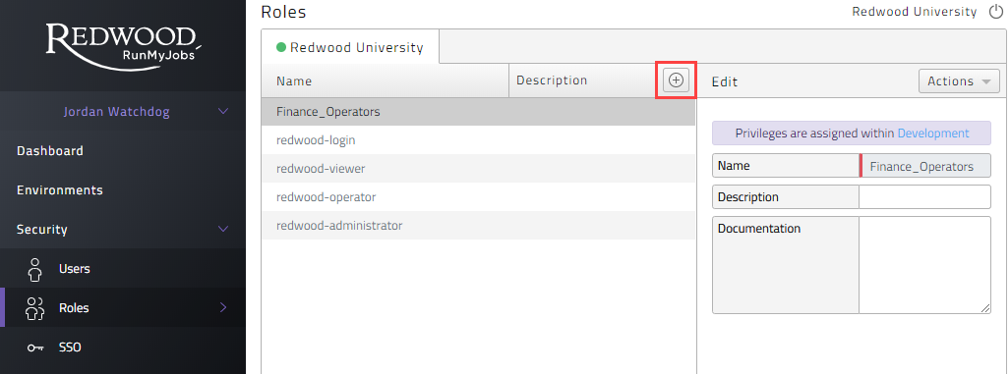
Figure 7: Creating a new custom Role
- In the field at the top type in the name of the role, in Figure 8 the name used is 'Finance_Operators'. This is also the name of the Role object that will be created in the automation environment(s) in which the role is granted.
- Next select the users that you wish to grant the role to. You can simply select users individually using the check box next to their names (Figure 6). In case SSO is configured the users have to be assigned via SSO groups. When going to the SSO tab you can then select which SSO group(s) will get this custom role as well as seen in Figure 9.
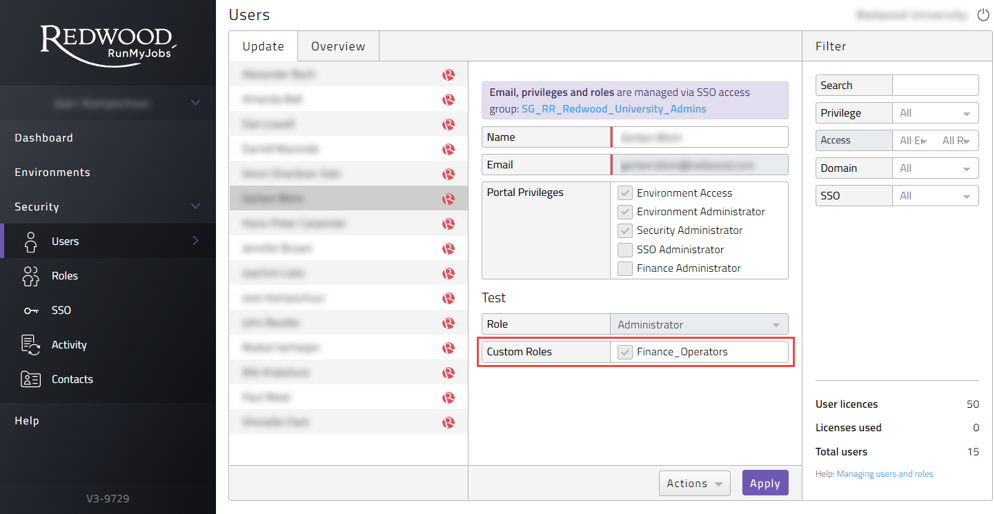
Figure 8: Assign Custom Role to user
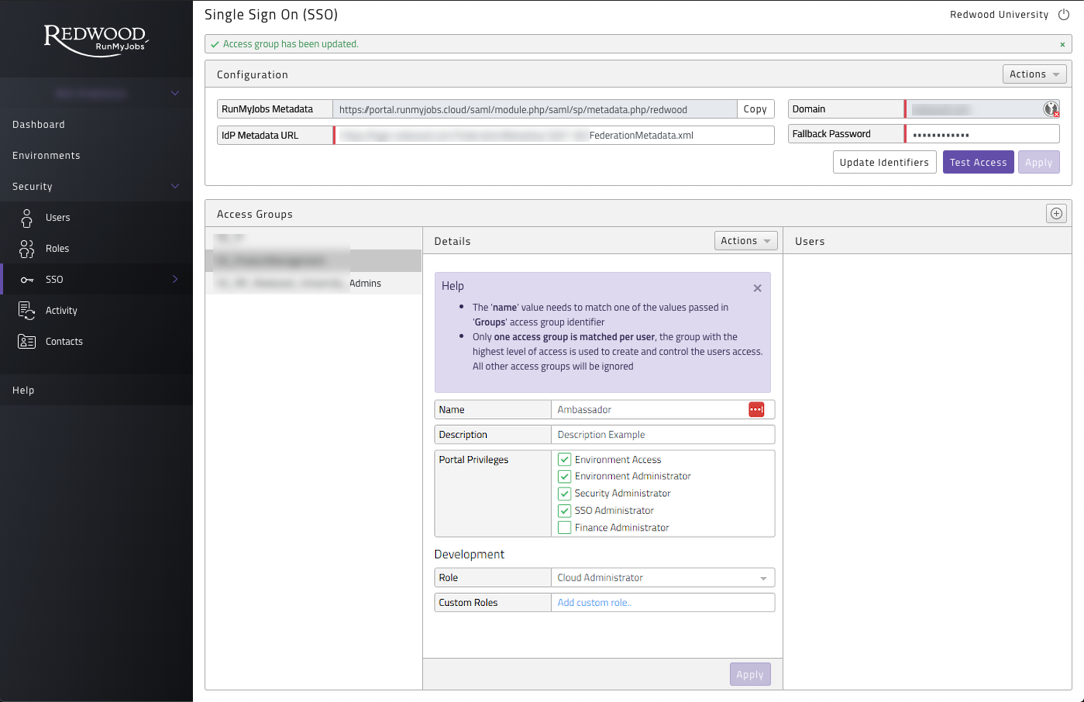
Figure 9: Assign custom role to group when SSO is configured, use the Description to override the display name.
note
The order of access groups is determined on the Total Access Value a Group represents. The access value is based on the sum of access granted to that Group. The Group with the highest access value that is assigned to you will be taken.

Figure 10: Total Access Value
The next steps require access to the Control Center in the automation environment.
Actions in the Control Center
You now you need to grant a rank/privilege to the custom role for the objects that are to be accessed by the users with the role. The following example details the steps necessary to allow the 'View' users which are granted the 'Finance_Operators' role to run a process chain definition called FIN_SAP_EN_BW in an SAP system called CI5_IDES.
- Login to the Redwood portal.
- Connect to the Control Center of the environment that you want to apply the role to. In this example as the 'Finance_Operators' role is to be used in the Production environment you will need to be a user with Administrator privileges in the Production environment.
- Edit security on the process chain that you want users to be able to submit as follows:
- Find the process chain in the Definitions > Chains group. Right click then select 'Edit Security' (Figure 11). This will launch the Edit Security dialogue. Note that you can also make these changes via the right click 'Edit' option, then selecting the Security tab in the object definition editor.
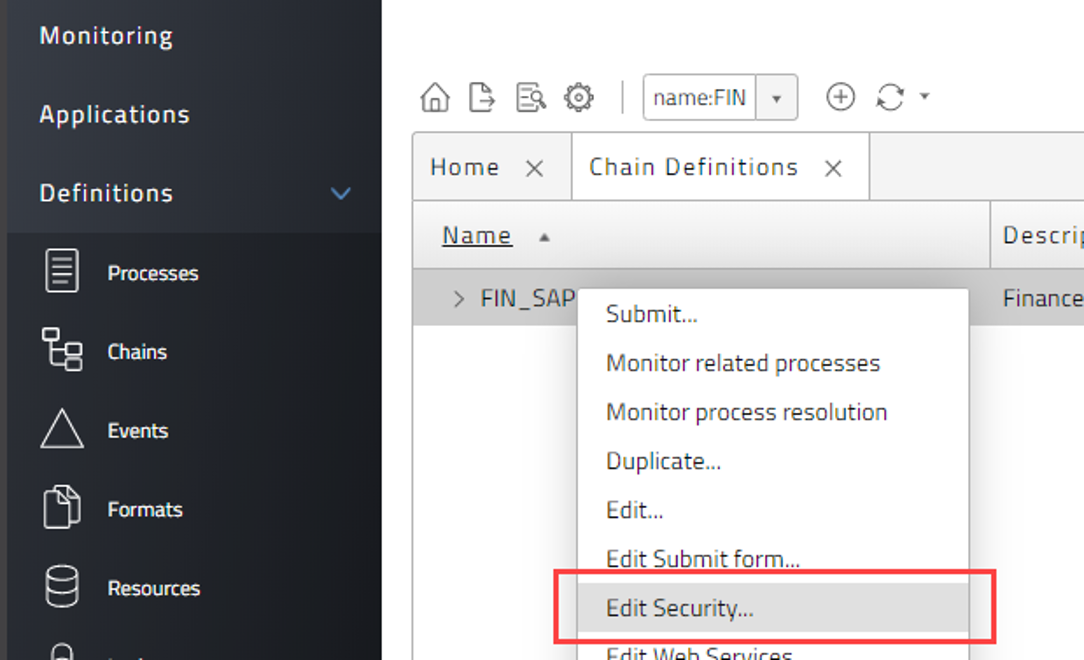
Figure 11: Select 'Edit Security'
- In the Edit Security dialogue, click on the gray button to the left of the top row in the table. This activates the User/Role drop down list (Figure 12). Select the role to which you want to grant privileges.

Figure 12: Selecting Role to Grant Privilege to.
- Next select the privilege you want to grant to that role by clicking in the 'Granted Rank' field. In this case we want users with 'Finance_Operators' to submit and view this chain, so 'Submit And View' is selected (Figure 13). Select 'Save and Close'.
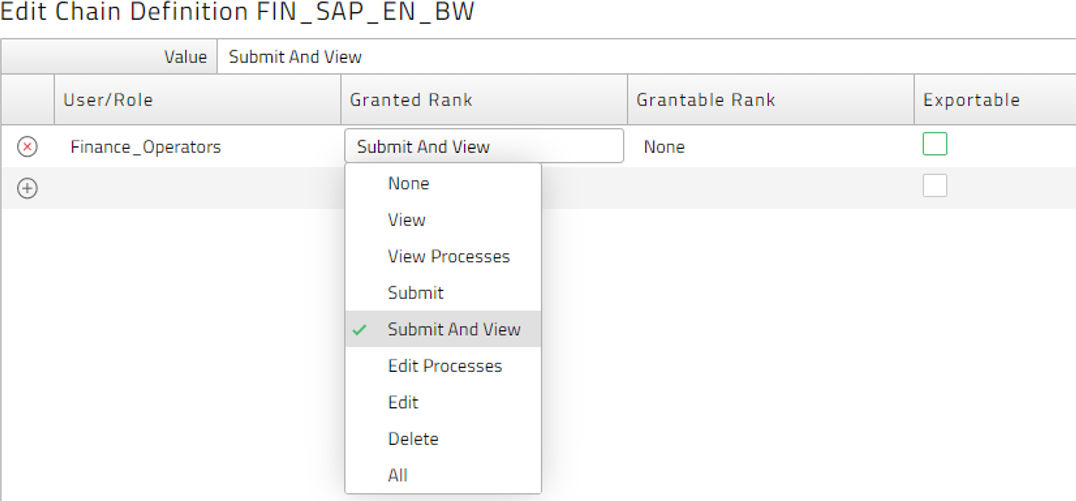
Figure 13: Selecting the Privilege to be allowed.
note
This process must be repeated for any process definitions or sub-chains called by the main process chain, unless the users with the new role already have the right access.
In a similar way edit security on the processing queue that the process chain needs to run against (queues are in the Environment > Queues group). Use the right click menu to access 'Edit Security'. Select the role as described in 3(c) above. To submit and monitor workload in queue the role needs to be granted 'Process Administrator' privilege. See Figure 14.
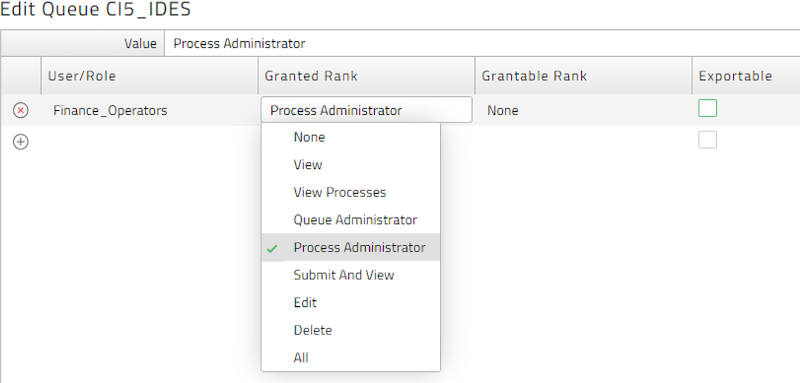
Figure 14: Setting Role and Privilege on a Queue.
Having completed the actions described above, the 'View' users that have been granted the Custom-'Finance_Operators' role will be able to submit and view the designated process chain onto the processing queue for SAP system CI5_IDES.
Considerations When Using Custom Roles
The following points should be considered if you are planning to use custom roles:
- Enabling custom roles requires privileges to be granted on processing queues. Ensure that allowing one set of users to submit processes onto that queue does not compromise integrity of other objects associated with the same queue. For example, if a queue is served by more than one process server. Some adjustments might be necessary to queue configuration to ensure that correct levels of control are maintained.
- Custom roles are granted on a per environment basis. Granting a role to users in Development does not give them the same rights in Test or Production. These have to be granted separately and can be applied to different groups of users.
- The highest level of access a user has in an environment takes precedence, irrespective of custom roles. For example, if a user already has 'Administrator' access to Production, granting that user a custom role that only allows submit for a limited number of process definitions in Production does not remove the Administrator access of that user. Think of custom roles as a way to grant access, not revoke it.
- Users with the 'Login' role can see the standard system process definitions, but cannot submit them. They cannot see or interact with any customer specific objects, unless granted access via a custom role.
- Users with 'No Access' to an environment cannot be granted a custom role in that environment.
Please also note that custom roles are defined and maintained by customers. Control of access granted by custom roles is the responsibility of customer 'Account Administrator' users, not the Redwood operations team.
Environment Notification Contacts
As part of the SaaS solution Redwood Support should be able to contact customers in case of certain scenarios that can impact the running automation. These contacts can be configured from the SaaS portal under Security Contacts. In most cases support will first create a support ticket before contacting directly. The Green or Red bullet shows if the email address is confirmed. In case it is not confirmed it is possible to resend the confirmation email by clicking on that contact.
Choose  button add new contacts:
- You can then select the type of contact in the drop-down
- It is mandatory to have at least 1 Support - General and 1 General - Notifications & Reports contact but advised to have each contact type specified. If needed with the same name.
- It is possible to have multiple contacts of the same type.
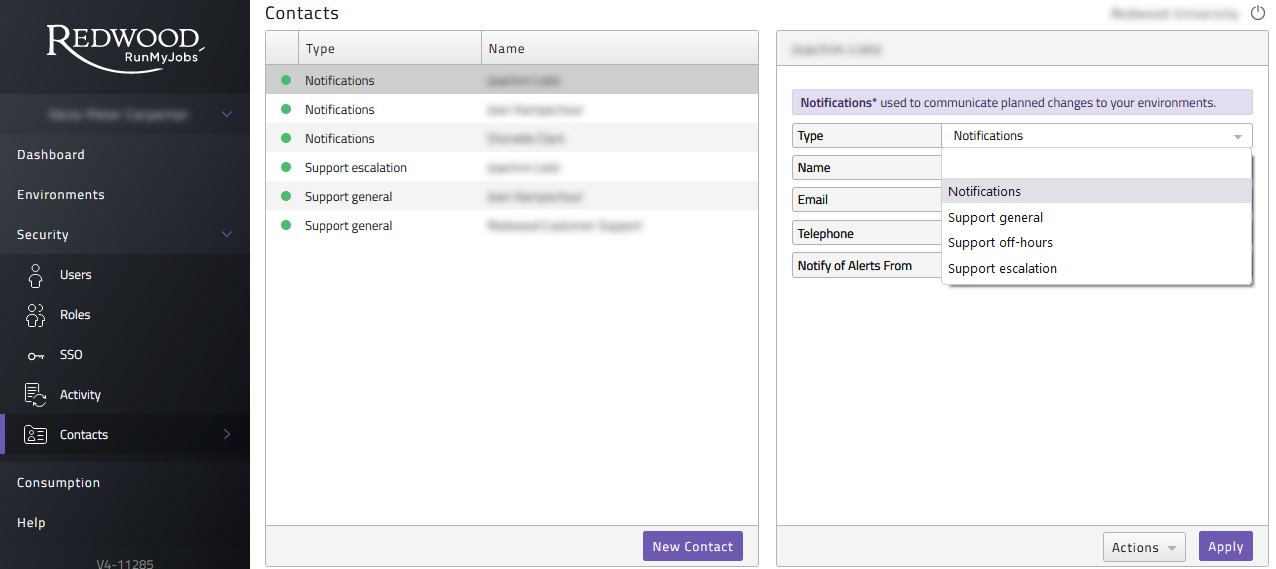
Figure 15: Portal contacts
The contact types below. It is advised to create multiple contacts and include phone numbers to make sure communication can be picked up fast. Do not forget to add the country code!
- Support - General Will be used as general contact for support in case of critical issues or situations where support notices possible issues can occur, or unexpected / bad practice behavior is detected and should be addressed.
- Support - Off-hours Will be used as technical contact in case off critical issues outside business hours (based on time zone from customer where contract is signed) where immediate action is required by the customer to assure the environment will stay up and running - a general On-Call number can be added. If no Off-hours contact is defined the General number will be contacted.
- Support - Escalation This person will be contacted if there are immediate issues and the General and/or Off-hours contacts do not respond. This can be a coordinator / team lead / manager.
- Notifications This contact will be used to send general, not support related, data and reports related to the environment. Think about usage data and announced upgrades.
Redwoods 24/7 monitoring system will trigger an alert for any issues detected on your environments. If you wish to be notified of these alerts by email you can assign contacts to the environment notifications per environment. This can be done two ways:
- A user with 'Security Administrator' role when adding or updating a contact can assign that contact to multiple environments.
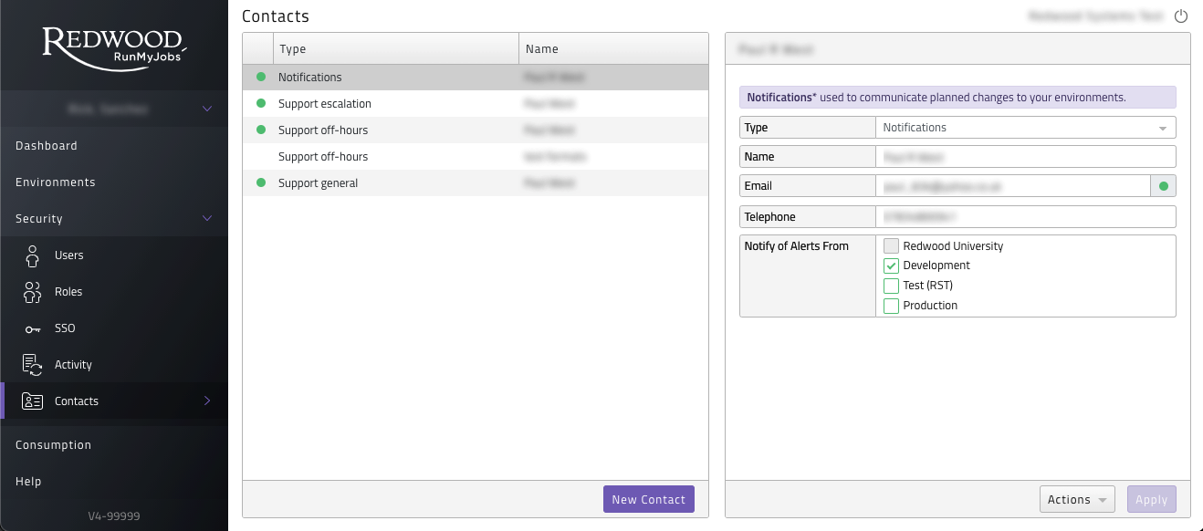
Figure 16: Contact Settings
- A user with the 'Environment Administrator' role can select verified contacts for each environment on the environment settings page.
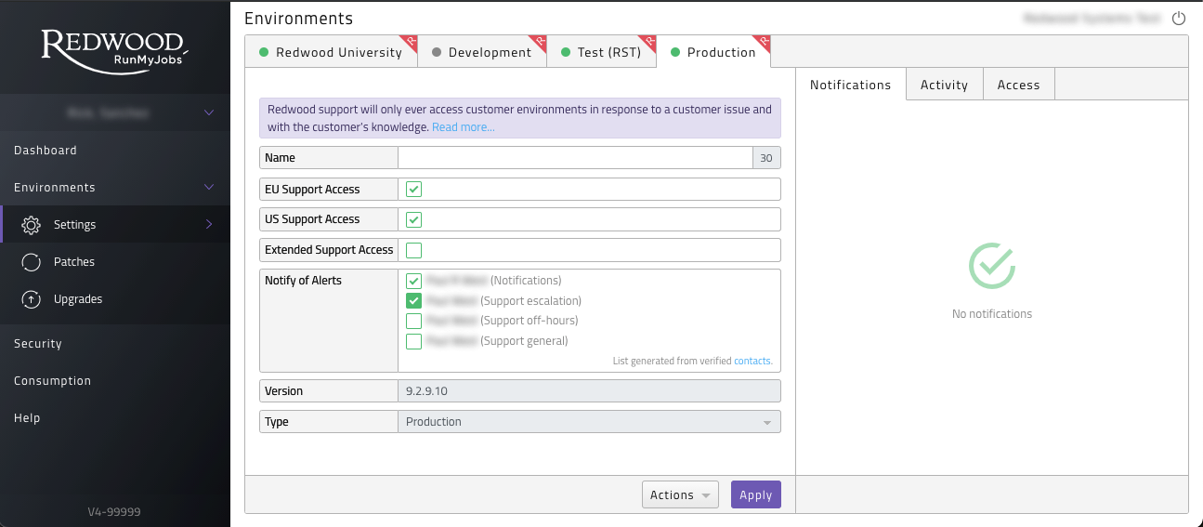
Figure 17: Environment Settings
Redwood Employees
Redwood support will have read only access to a customer environment for support purpose, this can be controlled per Redwood support region by opening the Environments screen in the Portal. Do note that this will limit the support Redwood can provide.
Any other Redwood employee will only get access to a customer environment if the customer grants this. A customer can decide to create a (temporary) internal account for a Redwood employee (for example a consultant during a project) and manage this user like any other user (SSO or not). Or the customer can add this Redwood employee by pressing the '+' in the Users screen and use the...@redwood.com email address. Doing this will create a Redwood icon next to this user making it very clear for user administrators that a Redwood employee is in this list. See 3 of them in Figure 18.

Figure 18: Redwood logo next to Redwood employee Users
cloudTopic
