 How to Install Platform Agents
Introduction
note
Before installing any Redwood Platform Agent please read the prerequisites listed in Platform Agent Installation and Connection Pre-Requisites below very carefully. Failure to comply with the prerequisites may mean that the agents will not install properly and your configuration may not be supported.
The Platform Agent is a small piece of software that is installed at the operating system level on the servers that you wish to manage workload on. The agent manages communication with the Redwood server, issues instructions to the local operating system and applications to submit and monitor jobs, handles file events and monitors local information such as CPU load and paging rate. The platform agent is an important part of the Redwood automation landscape as it provides a vital link between your servers and the Redwood solution.
This document outlines the procedures for connecting local servers to the Redwood SaaS solution via the Platform Agent.
Platform Agent Installation and Connection Pre-Requisites
To install Platform Agents correctly and be able to auto-update as part of the Redwood upgrade service, they must be installed in accordance with the procedures outlined below for each operating system type and must comply with the following prerequisites. Failure to follow these requirements may mean that Redwood cannot support your configuration:
- Microsoft Windows agents must be installed using a Windows system administrator account. UNIX and Linux agent installers can be run as a regular user, in this case a
root.shfile needs to be run using the 'root' account. - Auto update will be enabled when the agent is installed. This is necessary to ensure that agents remain synchronized with upgrades to the Redwood server in the Cloud. Modifying the installed agent such that auto-update is disabled is not supported. Do not tamper with the agent installation directory, in particular the bin and etc subdirectories. In addition, on Microsoft Windows do not change the settings of the scheduler service that is installed.
- The proxy or firewall should not block auto update downloads.
- Servers on which OS level jobs are to be automated, function as Secure Gateway or Spool Host require the installation of a Redwood Platform Agent. The agent requires a HTTPS connection to the Redwood Cloud. This connection is necessary to confirm agent configuration and communicate job status information to the server. Connection is made to:
- Host:
.###.cloud ###- Verify your URL after connecting to an environment.
- tcp port: 443
- Host:
| Product | Product URL (Region specific) – whitelist productname.cloud |
|---|---|
| RunMyJobs | https://dublin.runmyjobs.cloud/ |
| RunMyJobs | https://oregon.runmyjobs.cloud/ |
| RunMyJobs | https://frankfurt.runmyjobs.cloud/ |
| Finance Automation | https://dublin.runmyfinance.cloud/ |
| Finance Automation | https://oregon.runmyfinance.cloud/ |
| Finance Automation | https://frankfurt.runmyfinance.cloud/ |
- Remarks (dublin.runmyfinance used in this text, update this to your URL based on above table):
- The platform-agents connect to dublin.runmyfinance.cloud:443. The response uses another port, so the firewall rule must be 'response on outbound request is accepted'
- End-users use portal.runmyfinance.cloud in their browser session which is redirected to dublin.runmyfinance.cloud:443
- The https traffic to *.runmyfinance.cloud using 443 and proxy must be 'unrestricted' (no TLS inspection, SSL offloading, session hi-jacking or SSL encryption)
- Firewall rules based on DNS names (no IP addresses)
- A test connectivity URL is published to make sure the test is not interfered. This can be done by using the following curl:
curl -i https://dublin.runmyfinance.cloud/probeWhen this returns a return code 202 the connection is ok.
- The Redwood Platform Agent supports HTTP proxy software. During the installation process it will detect if a direct connection is possible to the Redwood Cloud. If this is not the case it will allow you to enter proxy details. If you do not have a proxy, it means your sever has no connection to the internet.
tip
Put runmyfinance.cloud on proxy whitelist.
note
An explicit or transparent proxy must pass on the HTTPS traffic unmodified in any sense. In other words, the use of inspection software that decrypts the HTTPS stream is not supported.
Downloading Platform Agents
- To download a Platform Agent start by adding a new Process server:
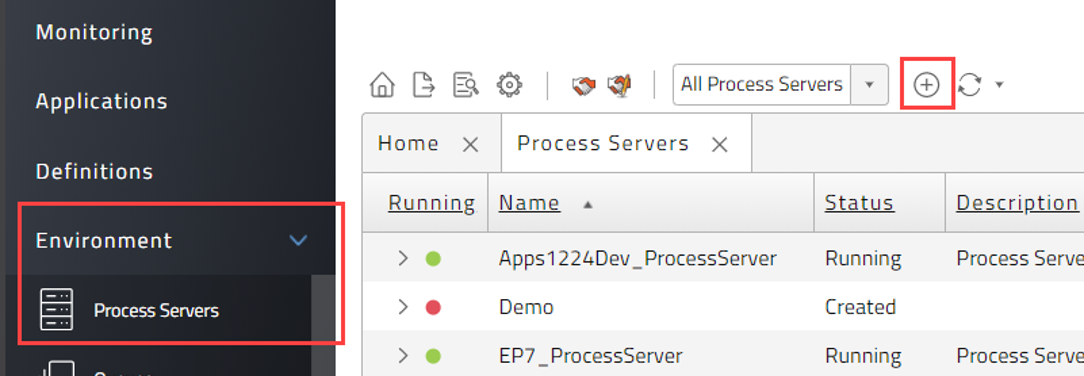
Figure 1: Create a Process Server
- Select that you want to create an OS Process Server
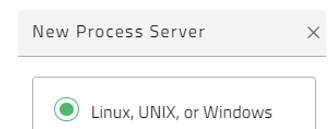
Figure 2: Select OS
- And follow the procedure by selecting the Process Server Partition, name and OS Family:

Figure 3: Basic details Platform Agent Wizard
- In case you select UNIX you will also be prompted to select a specific type:
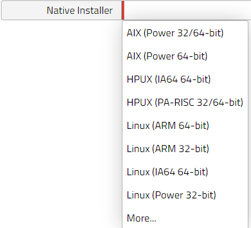
Figure 4: UNIX flavor selection
- Optionally you can go to Configuration > Software and download Platform Agents from there. The Server Hostname will then be used as Process Server name and in case you have Partitions you will be prompted to choose one.

Figure 5: Platform Agent download via Software menu
Installing Windows Platform Agents
The Platform Agent installation process will depend on the type of agent you have downloaded. You will need to be logged in as a user with sufficient privileges to install new components into the system. The following sections provide an overview of the installation process for a sample of agent types. In all cases, once the agent has been successfully installed it will be set to start automatically at system start-up and will attempt to connect to the Redwood Cloud. Successful installation of the agent will also create the necessary Process Server and Queue in the Redwood environment and associate the agent with these, the names of both the Process Server and Queue will be the same as the hostname of the system on which the agent has been installed.
Please see Section 1 above for information on pre-requisites and accessing the Internet via a proxy server.
Installing the Windows Agent
The Windows agent needs to be installed using a Windows system administrator account (see Section 1 above). This topic discusses the basic steps to complete the installation, see Creating a Windows Agent for more information.
The Windows download creates an executable file (default name platform-agent-windows-x86-x_x_x_x.exe where x_x_x_x will relate to a software release number). To install the agent run the executable, this will launch a standard Windows installer and directly install the agent.
The installation location will be C:\Program Files (x86)\Redwood\agent
If you wish to use a different location you will need to start the installation via the command line using the command: platform-agent-x86-x_x_x_x.exe -d c:/MyNew/Folder
If your server communicates to the Internet via a proxy server then the installation will detect it at this point in the agent installation. You will be prompted for the proxy server name and credentials (if required) that will allow the agent installation to access the Internet (see below).
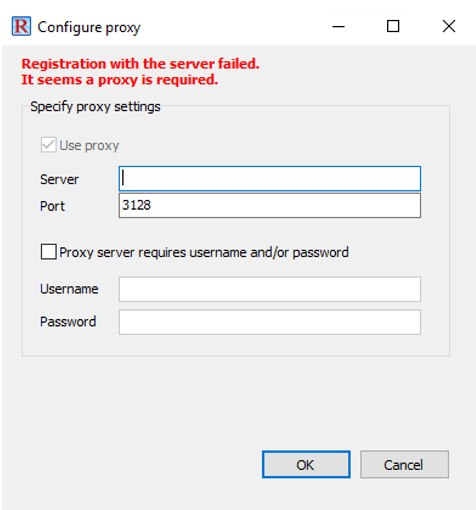
Figure 6: Proxy setup on Windows
When the installation has completed a confirmation pop-up window will appear and the Redwood service will be started on the Windows system.
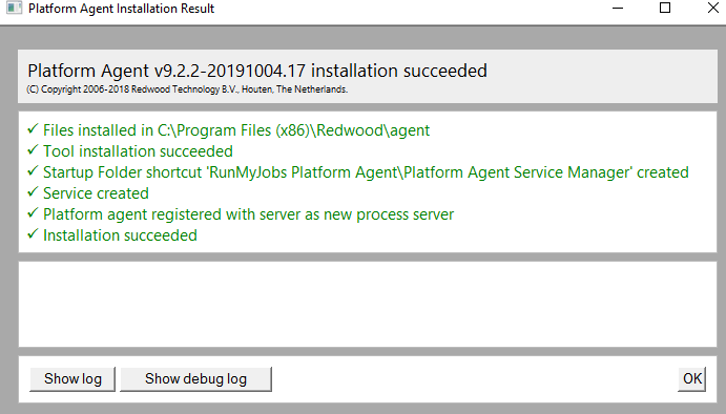
Figure 7: Installation log Windows
You can check the Platform Agent by running the Scheduler Service Manager from the Windows Start Menu select: Platform Agent Service Manager
This will launch a desktop widget that allows you to view the status, stop, start and uninstall agents on the Windows system.
The Scheduler Service Manager should show the agent as running, indicating successful installation and connection to the Redwood Cloud (see below).
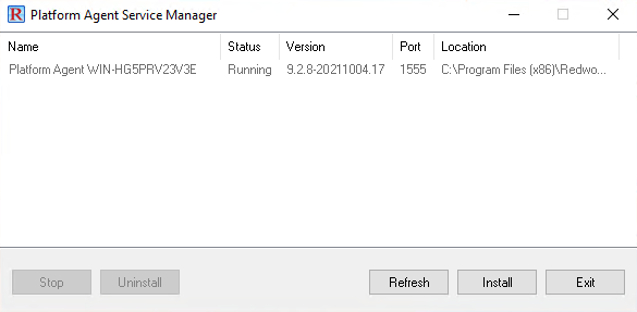
Figure 8: Platform Agent Service Manager
Installing a second agent on the same Windows server
In some scenarios you might want to install a second agent (or more) on the same sever. You can then double click the.exe again and you will be prompted with a new instance name + unique port number (picked automatically). If it is an existing platform agent setup an extra dialogue will be shown to confirm (or update) the needed settings to connect to the correct server. By default, this is filled with the server info from the environment where the download took place, make sure you confirm the instance and process server name are unique.
If you want to split the installation locations, it is possible to run the executable with the -d command to point to a DEV folder for example. This will still prompt the same screens as above, but installation will take place in another location.
Example command if you want to use the same server but split folders for DEV and TST:
platform-agent-windows-x86-9_2_9-20200224_15.exe -d C:\Redwood\TST
Installing UNIX Agents
This topic discusses the basic steps to install a UNIX agent, see Creating a UNIX Agent for more information.
Installation
The agent installation process for Linux and the various flavors of UNIX derived operating systems is very similar and involves running a binary executable. The following example is for Linux.
The Linux download creates a binary executable (default name platform-agent-linux-x86_64-x_x.bin where x_x will relate to a software release number). In the example below this is 9_2_9. First the file must be made executable by issuing the chmod command:
redwood@RWtest:/tmp/redwood$ ls -lt
total 14068
-rw-rw-r-- 1 redwood users 14403030 okt 7 10:28 platform-agent-linux-x86_64-9_2_9.bin
redwood!RWtest:/tmp/redwood$ chmod 755 platform-agent-linux-x86_64-!RW_VERSION_US@.bin
redwood@RWtest:/tmp/redwood$ ls -lt
total 14068
-rwxr-xr-x 1 redwood users 14403030 okt 7 10:28 platform-agent-linux-x86_64-9_2_9.bin
To start the installation, run the executable:
redwood!RWtest:/tmp/redwood$ ./platform-agent-linux-x86_64-!RW_VERSION_US@.bin
If your server communicates to the Internet via a proxy server then the installation will detect it at this point in the agent installation. If you are using a proxy server then please answer the following question with a Y to proceed.
* We were unable to connect to https://dublin.<*CustomerURL*>.cloud/<*CustomerName*>/<*CustomerEnv*>,
do you need to configure a proxy server? Answering No will HALT the installation! ('Y') #?
By answering 'yes' to the proxy server question you will be asked for the name of your proxy server along with the username and password if needed. Please enter as shown in the example below bearing in mind the password will not be shown on the screen. If you have entered the details correctly then a connection to the Redwood Cloud will be successful:
#? Y
* What is the hostname of your proxy server? ('no default')

#? MyProxyServer
* What is the portnumber of the proxy-server? ('3128')

#?
* What is the username for this proxy server (myproxyserver:3128)? ('no default')

#? MyProxyUsername
* What is the password for this user (myproxyusername)? ('no default')

#? MyProxyPassword
Once connection to the Internet is established (whether via a proxy server or not), the installation is designed to be self-contained and will require minimal interaction. The following messages might be displayed during the installation.
*** Redwood Platform Agent Installation - Version 9_2_9_20231002_17 ***

- The installation directory is '/opt/redwood/agent'
- Instance 'RWtest' is being configured

INFO 2023-10-02 10:39:13,080 CEST [4246-jinstall] jtool.main - jtool succesfully installed

* Under which user account should the job-processor run? ('redwood')

        #?
- The 'setuid' method has been configured
- This agent is configured in 'AgentInitiated' mode, all communications will be initiated by the agent.
- Registering Platform Agent 'RWTEST' at
  https://dublin.<*CustomerURL*>.cloud/<*CustomerName*>/<*CustomerEnv*>
  Writing 'RedwoodPlatform_redwood_cloud_10180' to
  '/opt/redwood/agent/net/instance/RWtest/server_acl'

- Systemd unit 'scheduler.service' will be created.
- Systemd unit 'scheduler@.service' will be created.
Created symlink /etc/systemd/system/multi-user.target.wants/scheduler.service →
/etc/systemd/system/scheduler.service.
- Systemd instance 'scheduler@RWTEST.service' will be created.
Created symlink /etc/systemd/system/scheduler.service.wants/scheduler@RWTEST.service
→ /etc/systemd/system/scheduler@.service.
- Installation is complete
- To finish the installation you will need to run '/opt/redwood/agent/root.sh' under the root account
INFO 2023-10-02 10:39:35,528 CEST [4095-sfx] sfx.main - Installation succeeded
The platform agent will be started automatically after successful installation.
Installing a second agent on the same Linux server
In some scenarios you might want to install a second agent (or more) on the same sever. You can then run the .bin again (or a new one) and the installation will start. The installation will automatically pick a new port, if the instance already exists the installation will error.
In that case you can change the instance name with -i and change the process server name with -ps to give it the names you want. Or you can download a new binary with this info from your environment. In this example we picked the name linuxtstagent to be installed in a test folder. It allows us to have a second dev instance in a separate folder to strictly split it. If you do not use the -d option, the different configurations (connections to Redwood instances) will be managed from the same installation
./platform-agent-linux-x86_64-9_2_9-20200124_14.bin -i linuxtstagent -ps linuxtstagent -d /opt/redwood/test
Installing the Mac OS Agent
The Mac OS X agent is installed via a package (default name platform-agent-macos-x86-x_x_x_x.pkg where x_x_x_x will relate to a software release number).
To start the installation, run the executable:
$ ./platform-agent-macos-x86_64-9_2_9-20211004_07.bin
If your server communicates to the Internet via a proxy server then the installation will detect it at this point in the agent installation. If you are using a proxy server then please follow the procedure. In case there is no proxy it means your system does not have internet access.
If internet access is confirmed the installation will continue.
$ ./platform-agent-macos-x86_64-9_2_9-20211004_07.bin

*** Redwood Platform Agent Installation - Version 9_2_9_20231002_07 ***

* In which language do you want the installation to proceed?

1. Exit Installation

1. English
1. Deutsch
1. Nederlands
1. Francais

#? [1]
*** Redwood Platform Agent Installation - Version 9_2_9_20231002_07 ***

 - The installation directory is '/opt/redwood/agent'
 - Instance '<hostname>' is being configured
INFO  2023-10-02 11:36:57,048 CEST [25207-jinstall] jtool.main - jtool succesfully installed
 - The default account for running jobs will be '<YourUser>'
 - The 'setuid' method has been configured
 - This agent is configured in 'AgentInitiated' mode, all communications will be initiated by the agent.
 - Registering Platform Agent '<hostname>' at https://dublin.<CustomerURL>.cloud/<CustomerName>/<CustomerEnv>
Writing 'RedwoodPlatform_redwood_cloud_10180' to '/opt/redwood/agent/net/instance/<hostname>/server_acl'

 - To finish the installation you will need to run '/opt/redwood/agent/root.sh' under the root account
INFO  2023-10-02 11:36:59,351 CEST [25074-sfx] sfx.main - Installation succeeded
Installing a JVM (Optional)
If you want to run Redwood System processes on the platform agent instead of in the cloud you must first install a supported Java 11 or 17 (recommended) JDK on your platform agent. Supported and tested Java 11 or 17 JDK's:
- Oracle JDK
- Eclipse Adoptium Temurin
- IBM Semeru
You can use another Java 11 or 17 JDK, but it must be supported by a vendor; If you encounter JVM-related issues that are not reproducible with the supported and tested JDK's above, you will have to contact your vendor for support.
You must ensure that the JDK is updated regularly with patches.
On Linux, fontconfig is required.
Installing a JCo for SAPR3 Processes (Optional)
If you want to run SAPR3 processes on the platform agent instead of in the cloud you must first install JCo 3.1 on your platform agent.
Navigate to SAP SAP Java Connector and download the appropriate JCo 3.1 ZIP file for your platform. Unzip the file contents into a directory, for example C:\\redwood\\sap\\jco
On Windows, set environment variable NATIVEJAVA_CLASSPATH for user System to the directory where you extracted the JCo files (jar file and dll's)
On UNIX/Linux, create an environment file named <pa_install>/etc/environment and insert the following:
export NATIVEJAVA_CLASSPATH=/path/to/jco
If you extracted the jar and libraries to /opt/sap/jco.
echo "export NATIVEJAVA_CLASSPATH=/opt/sap/jco" > "<pa_install>/etc/environment"
The fontconfig package is a requirement on UNIX.
You set the /configuration/jcs/sap/output/RetrieveOutputViaAgent registry key to true to enable agent retrieval of SAP spool files.
Secure Connections with SNC
Prerequisites
SAPCARfor your platform from launchpad.support.sap.comSAPCRYPTOLIBfor your platform
Workflow
Configuring SNC with jrfc to enable secure RFC connections greatly improves security. See SAP Note 1848999 for more information.
- Unpack the SAR file using
sapcar, for examplesapcar -xvf SAPCRYPTOLIBP_8540-20011697.SAR - Copy the SAP Cryptographic library (
sapcrypto.dllfor Windows orlibsapcrypto.<ext>for UNIX) to${InstallDir}/saplibs. - Set the
SNC_LIBenvironment variable (SNC_LIB_64on Windows with a 64-bit JVM) to the full path to the library file, such asC:\Program Files (x86)\Redwood\agent\saplibs\sapcrypto.dllor/opt/redwood/agent/saplibs/sapcrypto.so. - Follow the below procedure for creating the PSE files.
- Copy the PSE files to the directory defined in
SECUDIR, for example${InstallDir}/sapsec. - Set the
SECUDIRenvironment variable to the directory where you stored the PSE files, for exampleC:\Program Files (x86)\Redwood\agent\sapsecor/opt/redwood/agent/sapsec. - In
${InstallDir}/etc/startup/${Instance}/environmentyou specify the full path to SAP Cyprotgraphics library in theSNC_LIBenvironment variable (SNC_LIB_64on Windows with a 64-bit JVM), the full path of the direcorty containing PSE files in variableSECUDIR; ensure the user as which the platform agent runs can read the files in question. Restart the platform agent for the changes to take effect.
- Copy the PSE files to the directory defined in
note
For SNC on UNIX, the UUID daemon must be active. For more information see SAP Note 1391070
note
The <INSTALL_PATH>/saplibs directory is prepended to the library search path.
Create PSE files
_PASS=secret- Password of the PSE_FIPS=-fips on- Or empty if no FIPS is to be used_LPS=-lps- Or empty if no LPS is to be used_ALG= -a RSA:2048:SHA256- Algorithm to use_PSE=RunMyJobs.pse- Name of the PSE to create_CRT=RunMyJobs.crt- Certificate that needs to be installed in the target SAP system(s)_DN="CN=RunMyJobs, OU=Example, O=Redwood, C=NL"- Organizational name for RunMyJobs to be used<OS User>- the user that runs the platform agent
Execute the following commands after setting the environment variables (Windows cmd.exe examples):
: Create PSE
sapgenpse %_FIPS% gen_pse -v %_ALG% %_LPS% -x %_PASS% -p %_PSE% %_DN%
: For each Target SAP System
sapgenpse %_FIPS% maintain_pk -v -x %_PASS% -a <Target SAP certificate>.crt -p %_PSE%
: Export your own Certificate
sapgenpse %_FIPS% export_own_cert -v -x %_PASS% -p %_PSE% -o %_CRT%
: Create the logon to PSE for the user
sapgenpse %_FIPS% seclogin -v %_LPS% -x %_PASS% -p %_PSE% -O <OS User>
note
On Windows, you set OS user to SYSTEM.
Further Reading
- SNC Terminology
- Configuring SNC: External Programs - ABAP Platform Using RFC
- Exporting the Server's Certificate Using SAPGENPSE
- Creating the Server's Credentials Using SAPGENPSE
- Maintaining the Server's Certificate List Using SAPGENPSE
Checking Platform Agents from the Redwood Server
Redwood will automatically create, configure and connect the necessary 'Process Server' and 'Queue' required in the cloud in order for the platform agent to be accessible. The Process Server and the Queue associated with a specific platform agent will identified by the hostname of the connected server. To check status of your Process Servers click on the 'Environment' navigation bar group label then click on the 'Process Servers' icon.
Status of the Process Server after installation should be shown as 'Running'. See below.

Figure 13: Process Server screen with Running status Process Servers
Platform Agent Sizing
The Redwood platform agent can utilize different roles, for each role different sizing requirements are needed.
This is a list of the roles the agent can have and sizing requirements examples. Note that this is the sizing for the Agent only and should be available next to the normal machine specs. The application/script that is automated will required its own resources for the actual processing part.
The numbers are based on normal behavior (for example no tracing) and a spread load over the period described with average load, meaning not all processes keep running for longer periods (minutes/hours). If the load in an environment is focused in a smaller time frame the specs should be scoped to this.
In case the different roles are combined on a single platform agent the specs should be counted together. In case of higher load platform agents, it is not advised to combine these features. It is highly advised to use a dedicated spool host and 2 secure gateways (1 backup) in production.
warning
Every Redwood installation and customer environment is different. Many factors will affect the resource requirements for an environment. This means that the guidelines in this document are not definitive and no guarantee is given that the hardware specifications herein will deliver an optimum environment.
Internet connection
Every platform agent in the Redwood SaaS solution requires a connection to the internet. Data usage per job will in almost every case be below 25 KB (smallest process is down to 7 KB without any extra logs or data), meaning on average Redwood states any internet connection will be sufficient for a platform agent. In most cases only the secure gateway will need to transfer higher numbers on a single agent that require a bit more thoughts on the connection speed.
As example 1.000.000 executions require 25 GB of internet traffic. This is well above the average Redwood sees but a safe number to calculate with. Customer should take peak moments into account if there is a real need to calculate bandwidth.
These numbers exclude file transfer usage in case there is no direct agent-to-agent connection and data is streamed.
The proxy or firewall should not block file downloads from runmyjobs.cloud or runmyfinance.cloud.
Standard platform agent
Purely serves as automation on an OS, no Redwood specific actions are done here. Disk size grows due to process logs with a combination of # executions and retention time. A clean installation will only require 100 MB Disk.
| Number of Executions per day on this agent | Minimum specs |
|---|---|
| 1 – 5.000 | 1 Core / 1 GB RAM / 20 GB Disk |
| 1.001 – 50.000 | 2 Core / 2 GB RAM / 200 GB Disk |
| 50.001 – 150.000 | 3 Core / 4 GB RAM / 300 GB Disk |
| 150.001 > | 4 Core / 8 GB RAM / 500 GB Disk |
Secure Gateway
Windows, Linux x86 (Linux x86 64-bit highly preferred) supported for OS agent. The Secure Gateway serves as a router to direct communication, no process executions run here.
| Number of non-agent executions in the environment per day | Minimum specs |
|---|---|
| 1 – 100.000 | 1 Core / 2 GB RAM / 300 MB Disk / 1 Mbit |
| 100.001 – 750.000 | 2 Core / 2 GB RAM / 500 MB Disk / 3 Mbit |
| 750.000 > | 2 Core / 4 GB RAM / 750 MB Disk / 5 Mbit |
Spool Host
Windows, Linux x86 (Linux x86 64-bit highly preferred) supported for OS agent. The Spool Host only serves as spool/data storage location, no process executions run here. The disk size highly depends on the (spool) file size you have, below is an example and the actual size should be calculated based on your average spool size and retention on this server. Multiple spool hosts can be created to control the disk space.
| Number of (spool) files per day | Minimum specs |
|---|---|
| 1 – 10.000 | 1 Core / 1 GB RAM / 5 GB Disk |
| 10.001 – 250.000 | 2 Core / 2 GB RAM / 150 GB Disk |
| 250.001 > | 2 Core / 4 GB RAM / 500 GB Disk |
JVM
The JVM agent can execute certain Redwood and other Java related processes. In case of simultaneous executions, the required size can be higher. Parallel executions highly increase the Core / Memory usage. JVM Agent should run on the same Java version as the Redwood Central server (Java 11 or 17), Java runs best on Linux.
| Number of Executions per day on this agent | Minimum specs |
|---|---|
| 1 – 5.000 | 2 Core / 4 GB RAM / 20 GB Disk |
| 1.001 – 50.000 | 8 Core / 16 GB RAM / 200 GB Disk |
| 50.001 – 100.000 | 16 Core / 32 GB RAM / 300 GB Disk |
Process File Locations
The following table lists the process file storage locations per definition type.
| Process Definition Type | Storage Location |
|---|---|
AS400 | Central server |
BASH | Platform agent |
CMD | Platform agent |
CSH | Platform agent |
DCL | Platform agent |
FTP | Platform agent |
GROOVY | Platform agent |
HTTP | Central server |
JAVA | Platform agent |
JCL_FTP | Platform agent |
JDBC | Central server |
JOB_CHAIN | The chain definition type does not generate any files. |
KSH | Platform agent |
MAIL | Central server |
OBJECT_SEARCH | Central server |
OraApps | Spool host |
OracleJob | Central server |
OraOhi | Spool host |
OS_NATIVE | Platform agent |
PeopleSoft | Spool host |
PERL | Platform agent |
PERLUNICODE | Platform agent |
PS1 | Platform agent |
PUBLISH | Central server |
PYTHON | Platform agent |
R | Platform agent |
RECONCILIATION | Central server |
REDWOOD_SCRIPT | Central server |
REPORT | Central server |
SOAP | Central server |
SAP_BOBJ | Spool host |
SAP_PI | Spool host |
SAP_R3 | Spool host |
System | Central server |
UserMessage | The user message definition type does not generate any files, attachments, however, are stored on the central server. |
note
Output and log files of pre-running, on-change, and post-running Actions are stored on the central server, regardless of the definition type.
note
Get Support Files processes store the output files on the central server, by default. A Java process server will be used to run the process and store its output files if one exists.
See Also
- Install a platform agent - video
- Creating a Microsoft Windows Process Server
- Creating UNIX Process Servers
cloudTopic
